menu
USS Elmore


Battle Stars

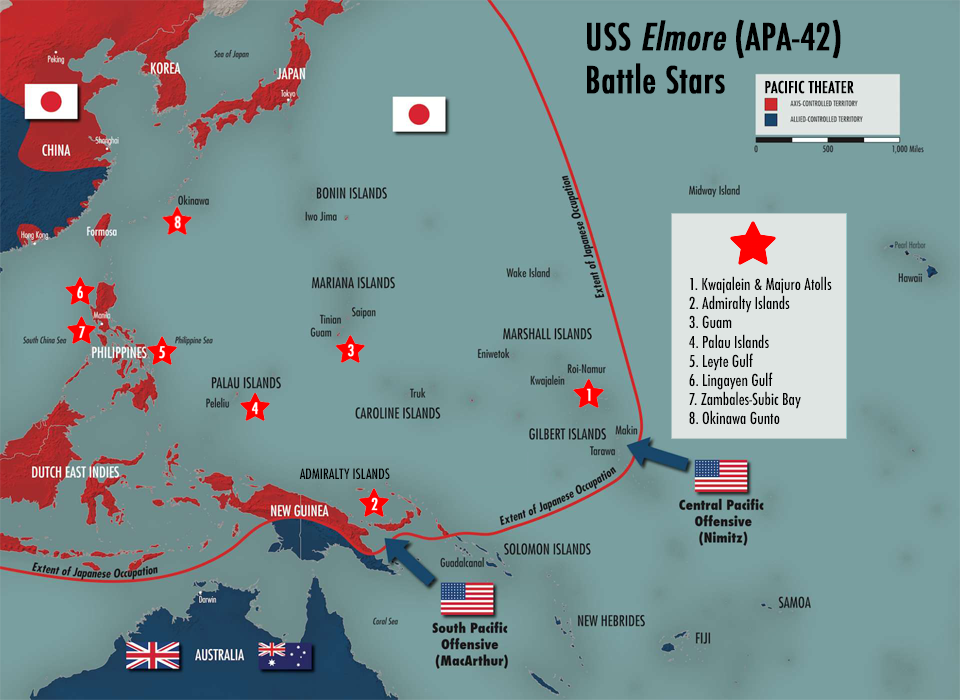

USS Elmore (APA-42) earned eight battle stars in the Pacific campaign during World War II.


Marshall Islands Operation
Capture and occupation of Kwajalein and Majuro Atolls, 31 January to 8 February 1944.
Close
Battle
Battle of Kwajalein
Introduction
In late January 1944, a combined force of U.S. Marine and Army troops launched an amphibious assault on three islets in the Kwajalein Atoll, a ring-shaped coral formation in the Marshall Islands where the Japanese had established their outermost defensive perimeter in World War II. Kwajalein Island and the nearby islets of Roi and Namur were the first of the Marshall Islands to be captured by U.S. troops, and would allow the Pacific Fleet to advance its planned assault on the islands and its drive towards the Philippines and the Japanese home islands.
The Marshall Islands and The U.S. “Island-Hopping” Strategy
The peace settlement that ended the First World War gave Japan a mandate over the Marshall Islands in the western Pacific Ocean. Kwajalein, in the Ralik (western) chain of the Marshalls, was the world’s largest coral atoll, numbering some 90 islets (with a total land area of six square miles) surrounding a 655-square-mile lagoon. By the beginning of World War II, Japan had established the Marshalls as an integral part of its defensive perimeter, and the islands became an important target for the Allies in their wartime planning.
The "island-hopping" strategy of 1943 represented a compromise between two major U.S. commanders: General Douglas MacArthur, who pushed for the immediate recapture of the Philippines (taken by the Japanese in 1942) and Nimitz, who advocated bypassing the Philippines for weaker-held positions in the Pacific.
In 1943, after Japan had scored victory after victory during the first months of war in the Pacific, Admiral Chester Nimitz proposed an aggressive counteroffensive strategy consisting of a series of amphibious assaults on selected Japanese-held islands on the way to the Philippines and on towards Japan itself. The strategy, known as “island-hopping” or “leapfrogging,” turned on the idea that merely isolating some Japanese forces on their islands–letting them “wither on the vine”–would be as effective as destroying them through a direct attack, and far less costly to Allied forces.
From Tarawa to Kwajalein
The bloody conquest of Tarawa, a small atoll in the Gilbert Islands of the central Pacific, in November 1943 was a crucial precursor to the Allied campaign in the Marshall Islands. The 5,000 Japanese troops garrisoned on Tarawa mounted a ferocious resistance, killing more than 1,000 U.S. Marines and wounding another 2,100. Nearly all of the Japanese troops on Tarawa perished, in a striking example of the never-surrender attitude that would characterize the entire Japanese war effort.
Between Tarawa and Luzon, the main island of the Philippines, were 2,000 miles of sea, plus more than a thousand scattered atolls, many of them fortified with Japanese troops. The lessons of “Terrible Tarawa” (as the Marines dubbed it) helped the Allies prepare for the hard fighting that would characterize the central Pacific campaign. Moreover, because neither the Japanese fleet nor any land-based aircraft from other islands had interfered, Nimitz concluded it would be safe to skip other Marshall Island garrisons and proceed to the westernmost atolls in the chain: Kwajalein and Eniwetok.
Attack on Kwajalein, Roi and Namur
On January 30, 1944, after a massive air and naval bombardment lasting some two months, a U.S. Marine and Army amphibious assault force of 85,000 men and some 300 warships) approached the Marshall Islands. On February 1, the 7th Infantry (Army) Division landed on Kwajalein Island, while the 4th Marine Division landed on the twin islands of Roi and Namur, 45 miles to the north. A single Marine regiment captured Roi on that first day, while Namur fell by noon of the second day. The battle for Kwajalein would prove more difficult, as the 7th Infantry pounded the Japanese garrison there for three days until the island was declared secure on February 4.
Though greatly outnumbered from the start (by more than 40,000 on Kwajalein) the Japanese chose to fight until the bitter end. Japanese casualties on Roi and Namur numbered more than 3,500 killed and around 200 captured, with less than 200 Marines killed and some 500 more wounded. On Kwajalein, close to 5,000 Japanese defenders were killed and only a handful captured; the 7th Infantry counted 177 soldiers killed and 1,000 wounded.
Effects of U.S. Victory
While not an easy victory for the Allies, the capture of Kwajalein was accomplished ahead of Nimitz’s expectations, allowing him to advance by 60 days the planned attack on Eniwetok, 400 miles northwest of Kwajalein. An assault on Truk – a forward anchorage of the Japanese fleet – destroyed 275 Japanese aircraft and sank nearly 40 ships, and Eniwetok fell by February 21, after five days of fighting.
Their success in the Marshalls gave U.S. forces a major anchorage point and staging area from which to continue their amphibious operations in the central Pacific, as they opened the way to the Mariana Islands, including Saipan and Guam. In addition, the victories intensified the isolation of those Japanese island outposts that had been skipped in the Allied island-hopping campaign, including Wake Island, one of the first islands Japan had captured in the beginning stages of the war.
Source: History.com, https://www.history.com/topics/world-war-ii/battle-of-kwajalein
Map 1

Map 2

Log

Bismarck Archipelago Operation
Admiralty Islands landings, 11 to 12 April 1944.
Close
Battle
Admiralty Islands Landings
Introduction
The invasion of the Admiralty Islands (29 February-25 March 1944) was a major step in the isolation of the powerful Japanese base at Rabaul and saw forces from the US calvary capture the main islands in a series of battles that lasted for one month. The conquest of the Admiralty Islands helped complete the isolation of Rabaul by giving the Allies control of the western approaches to New Britain, as well as a useful site for airfields and control of the massive Seeadler Harbor.
Allied Strategy
The Admiralty Islands sit at the north-west corner of the Bismarck Sea, west of the Bismarck Archipelago (New Britain and New Ireland) and north of New Guinea. Allied control of the islands would thus help further isolate Rabaul, at the northern tip of New Britain, as well as providing bases for the Allied advance along the north coast of New Guinea. A further bonus would be control of the massive Seeadler Harbor, 20 miles long and 6 miles wide, a harbor capable of sheltering an entire fleet.
Japanese Strategy
The Japanese had recognized the importance of the Admiralty Islands. They were defended by 4,300 men, commanded by Colonel Yoshio Ezaki. They had also built an airfield on the largest island, Manus, and on nearby Los Negros. When the Americans attacked they would be outnumbered, but Ezaki expected the attack to come from Seeadler Harbor and so his defenses were all facing in, towards the harbor.
The Admiralty Islands had been an American target for some time, and the invasion was originally timetabled for April 1944. Early in 1944 aircrews from the Fifth Air Force reported that there was no Japanese activity on the islands. In addition, MacArthur was impatient to speed up his advance towards the Philippines. He decided to push the invasion forwards to late February 1944, but also realized that the aerial reconnaissance might be inaccurate. He decided to make the original landings a 'reconnaissance in force' and to accompany the task force in person so he could decide if the islands could be held or not.
The decision to invade was made on 24 February, with D-Day set for 29 February. Los Negros would be the first target, and the landing would be carried out by 1,000 men from the 1st Cavalry Division (Dismounted). A reserve of 1,500 men was also available. The landings would take place at Hyane Bay, on the east, ocean-facing, coast of Los Negros.
Geographical Significance
The Admiralty Islands contains eighteen main islands. The largest island, by far, is Manus. The island is about 100km/ 60 miles from west to east and 30km/ 18 miles from north to south. At the eastern tip of Manus is Los Negros, the third biggest of the islands. This island takes the shape of a horseshoe, curving around to the north then to the west. A series of small islands then run west from the north-western tip of Los Negros, running parallel to the north-eastern coast of Manus. The area inside this line of islands is Seeadler Harbor.
Allied Landings
On 27 February MacArthur boarded the USS Phoenix, the flagship of the invasion forces. On the same day a force of six scouts landed on Los Negros. They landed safely but found that the island was 'lousy' with Japanese troops. The news reached MacArthur at sea on 28 February, but he decided to press away with the invasion anyway. On the morning of 29 February the 1st Cavalry landed on Los Negros. The Japanese were caught entirely out of position, and the Americans quickly established a beachhead. That afternoon MacArthur paid a two hour visit to the island, and decided that his men should stay. He then left, taking most of the naval support force with him.
That night the Japanese launched an attack on the beachhead, but the Americans held their ground. In some areas the Japanese did manage to get inside the perimeter, and on the following morning the area had to be re-secured. Sixty-six Japanese troops were killed within the main perimeter.
Two days later reinforcements arrived, just in time to help repulse a second major Japanese attack on the night of 3-4 March. This was a more serious attack, and the Americans lost 61 dead while fighting it off. Japanese losses were much heavier, with 750 dead around the perimeter. This was the last major Japanese attack on Los Negros. The last major fighting came on 21-25 March, when the Japanese were forced out of their last organized defenses, on a ridge near Papitalai
Manus Island was the next target. The Manus task force entered Seeadler Bay on 9 March and began by occupying the islands that ran west from the northern end of Los Negros, parallel to Manus. The Japanese put up unexpectedly fierce resistance on Hauwei, but the island was secured on 12 March.
On 15 March the Americans landed at Lugos Mission, west of their main target at Lorengau. Lorengau airfield fell on 17 March, and the town fell soon afterwards. The hardest fighting came when the Americans began to advance south from Lorengau towards Rossum. This battle lasted from 19-25 March and ended organized Japanese resistance in the Admiralty Islands. The campaign officially came to an end on 18 May 1944, but by then the only Japanese left were isolated bands of stragglers.
Effects of U.S. Victory
The two battles cost the Americans 326 dead and 1,200 wounded. The Japanese lost 3,280 dead.
On New Guinea, the fall of the Admiralty Islands convinced General Adachi that he could no longer hold onto his base at Madang. He ordered his men to march west to Hansa Bay and Wewak, where he expected the next American blow to fall. Allied trooped made an unopposed entry into Madang on 24 April, two days after they had leapfrogged Adachi yet again, landing at Aitape and Hollandia, half way along the north coast of New Guinea.
The Admiralty Islands also became an important American base. Seeadler Harbor was a very useful naval base. In addition, a PT base was built at the northern tip of Los Negros, with a 8,000ft airstrip nearby and a 7,000ft airstrip was completed at Momote, near the original landing point at Hyane Harbor.
Source: Rickard, J (5 May 2015), Invasion of the Admiralty Islands, 25 February-25 March 1944
http://www.historyofwar.org/articles/campaign_admiralty_islands.html
Map 1

Map 2
Log

Marianas Operation
Capture and occupation of Guam, 21 to 25 July 1944.
Close
Battle
Battle of Guam
Introduction
The battle of Guam (21 July-9 August 1944) saw the Americans reconquer an island that had been in their hands before the war after three weeks of fighting, completing the conquest of the Mariana Islands.
Allied Strategy
Guam was the southern island in the Marianas group. Like Saipan and Tinian, it offered several locations for B-29 airfields, but unlike those islands it also had an excellent protected anchorage that could be used by the US fleet. The island had been in American hands since the Spanish-American War, but it had fallen to the Japanese on 10 December 1941, after three hours of fighting, and had been in their hands ever since.
The original plan had been to invade Guam on 18 June, three days after the invasion of Saipan. However early on 16 June Admiral Spruance cancelled that decision, as a result of the discovery of a massive Japanese naval force heading his way. The invasion of Guam was postponed, and the fleet prepared to fight a major battle. The resulting Battle of the Philippine Sea (19-20 June 1944) was a crushing defeat for the Japanese, effectively destroying the IJN's naval aviation branch. The invasion was then further postponed when the main reserve force for the invasion had to be committed on Saipan. The new reserve force, the 77th Division, had to move up from Hawaii.
The delay meant that Guam was subjected to the longest pre-invasion naval bombardment of the Pacific War, lasting from mid-June, when the US fleet first appeared off the islands, to the invasion, well over a month.
Under the new plan Guam would be attacked first, with the invasion of Tinian starting three days later.
The island was protected by natural barriers. There were cliffs along much of the shore, and reefs blocking the approaches. The northern half of the island wasn't suitable for attack. The best landing points were in the south-west, south of the Orote Peninsula and north of the Piti naval station, north of the Peninsula. The island was long and narrow, with the Orote Peninsula the only major one. The southern half of the island is more rugged than the north, with a line of mountains around the southern half of the west coast. Apra Harbour, the good anchorage, was sheltered by the Orote Peninsula, while the capital city of Agana was further to the north-east along the coast.
Japanese Strategy
Guam was defended by 19,000 Japanese troops under General Takashina Takeshi. There were two operational airfields on the island at the time of the invasion, one on the Orote Peninsula on the west. Takashina realized that the invasion would almost certainly come in the south-west and eight of his eleven infantry battalions were posted in that area and the other three moved slowly closer to that area as the bombardment continued.
Allied Landings
The invasion of Guam was carried out by the newly formed 3rd Amphibious Corps (General Roy Gieger). Three forces were involved, all of which were to land on the western coast. On the left the 3rd Marine Division (General Allen Turnage) landed north of Apra Harbor. On the right the 77th Infantry Division (General Andrew Bruce) and the 1st Brigade (General Lemuel Sheperd) landed south of Apra Harbor. The two landing zones were five miles apart, and it would take four days for the two forces to join up.
The invasion began one minute ahead of schedule when the 3rd Marines landed at Asan Beach, on the American left, at 0829. After a day of heavy fighting that coast the Marines 105 dead, 536 wounded and 56 missing, the Marines had established a beachhead that was 4000 yards wide and a mile dead in most places. That night there was a disorganized Japanese counterattack, but nothing like the massive banzai charge that had been expected.
On the right the 1st Marine Brigade ran into heavy Japanese fire while approaching Agat beach, losing 350 men during the day. By the end of the day the Marines had established a food hold 4,500 yards wide and 2,000 yards deep. The major Japanese counterattack of the night came on this front, where there were three large attacks between 0230 and 0400. All three were repulsed, and as was so often the case these wasteful counterattacks achieved nothing apart from weakening the defenders.
The two beachheads remained separate for another four days, fighting largely separate battles.
On the right the 1st Brigade captured the Alifan ridgeline and established a strong right flank. One regiment from the 77th Division took over on the left, allowing the rest of the marine brigade to wheel right and advance north. They were ready to attack the Orote peninsula by 26 July.
On the left the 3rd Division had to capture a series of mountainous ridges before they reached more open ground on the Fonte Plateau. On their right they pushed south towards a junction with the 1st Brigade, leaving their lines dangerously stretched. General Takashina realised that this gave him a chance, and on the night of 25-26 July he committed seven battalions to a determined counterattack. This time the banzai attack came perilously close to success, with Japanese troops breaking into the American positions and the battle descending into a series of skirmishes scattered around the beachhead. Even so US firepower eventually won the battle, and when the fighting finished on the following day the Japanese had lost 3,500 dead (including 95% of the officers involved in the attack), the Americans 166 dead, 645 wounded and 34 missing. On the same night the Japanese troops trapped on the Orote Peninsula carried out an equally costly, but less effective attack. In one night the Japanese had thrown away a large part of their strength.
The surviving Japanese troops made the US advance as difficult as possible. It took four days for the 1st Brigade to capture the Orote Peninsula, which fell on 29 July. By now the Japanese had evacuated the southern half of the island. The Americans concentrated on taking the high ground in front of their beachheads and made secure contact between them on 28 July. They then turned north, with the 3rd Marines on the left and the 77thj Infantry on the right. Once again, the advance north was hard fought, and fairly costly, although not as bad as they might have been if the Japanese hadn't wasted so much strength on the night of 25-26 July. On the right the 77th captured the final Japanese strong point at Mount Santa Roas, while on the left the Marines fought their way to the north coast.
Effects of U.S. Victory
The advancing troops finally reached the northern end of the island on 10 August, and the island was declared to be secure. Even so Japanese troops continued to offer resistance for some time to come, and the last two didn’t surrender until 1960! The fall of Guam ended the major fighting in the Marianas and left the islands firmly in American hands. On Guam they had lost 1,744 dead and 5,970 wounded, while the Japanese had lost over 18,000 dead and 1,250 prisoners. The Americans were now free to use Guam as a naval and air base, and strike deep into the Japanese Empire and even reach the home islands.
Source: Source: Rickard, J (27 February 2018), Battle of Guam, 21 July-9 August 1944,
http://www.historyofwar.org/articles/battles_guam_1944.html
Map 1

Map 2
Log

Western Caroline Islands Operation
Capture and occupation of southern Palau Islands, 6 September to 14 October 1944.
- Beach Purple - was situated along the southeast coast of the island and its major advantage was that it had a very narrow reef and one area that the landing craft would be able to actually come right up to the beach. The Japanese also thought this was a strong candidate for a landing and so placed substantial defences on it. There was also a mangrove swamp just inland that left a narrow strip of dry land to act as a causeway. This would be excellent defensive terrain and so Purple was ultimately rejected.
- Beach Scarlett - this was situated on the southern tip of the island and quickly rejected as a landing there in combination with another beach would increase the risk of casualties from friendly fire.
- Beach Amber - this was situated along the northwest coast of the island and had the disadvantages of having the widest part of the reef, would be under enfilade fire from nearby Ngesebus Island and was very close to some high ground which would dominate the beach if not taken quickly. This was also rejected.
- Beaches White and Orange - these provided an opportunity to drive eastwards across the island straight towards the airfield. These were the beaches selected.
Close
Battle
Battle of the Palau Islands
Introduction
By 1944, the Japanese, while being far from defeated, were well and truly on the defensive. In Southeast Asia, British and Commonwealth forces had halted the Japanese offensive towards Kohima and Imphal and begun an offensive of their own which was pushing the Japanese back into central Burma. In the Pacific, the Americans had their two-prong drive well underway with the securing of Guadalcanal (Solomon Islands) and Tarawa (Gilbert Islands), followed up with the landings on Bougainville (Solomon Islands) and New Britain and the Admiralty Islands in 1943 and on Luzon (Philippines), Guam, Tinian and Saipan (Mariana Islands) in 1944, as well as continued fighting in New Guinea. As 1944 progressed, the Americans started to look towards securing targets much closer to the Japanese home base in order to have staging areas to prepare for their final attack on Japan, eventually codenamed Operation Downfall. These were likely to include Iwo Jima, Okinawa and Formosa, all of which had significant garrisons on them, MacArthur favoring the Formosa / China route, while Nimitz favored the Iwo Jima / Okinawa (Ryukus Islands) one.
The Palau Islands
The Palau Islands lie in an archipelago that stretches for over a hundred miles in a line running roughly from the northeast to southwest, starting with the largest island of Babelthuap and then continuing with Koror, Arakabesan Island, Urukthapel, Eil Malk, Ngemelis Island, Ngeregong Island, Garakayo Island, Ngesebus-Kongauru Island, Peleliu and finally Angaur. Peleliu is just over twenty square miles in size, and has a similar shape to that of a lobster claw. The southern end of the island is flat and open (well suited to the construction of an airfield) while the centre is dominated by the Umurbrogol Mountain that is, in actual fact, a series of limestone coral ridges, much of which is blanketed by thick jungle. Spanish missionaries discovered the islands in 1712 (although some claim that Spanish explorers under the Portuguese navigator Ruy Lopez de Villalobos chanced upon the island in 1543) and while the Spanish never really developed the islands, they were sold to Germany in 1899 after its defeat in the Spanish-American War. The Germans started to exploit the extensive phosphate reserves, particularly on Angaur, but their tenancy was short-lived as the Japanese declared war on Germany on 14 August 1914 and seized their Pacific possessions, including the Palau islands by the South Seas Squadron under Rear Admiral Tatsuo Matsumara on 4 October 1914. The League of Nations awarded the mandates to Japan in 1920, despite opposition from the United States, and a civil government (South Sea Bureau) was installed in 1922 with the South Sea Defense Force created to defend the mandate. Between the wars, Japan established a major presence on the Palau Islands that was somewhat shrouded in secrecy - it was on Koror that Lt Col Earl (Pete) Ellis, USMC died in mysterious circumstances in 1922 while touring the Pacific (he was in fact spying for the US Government). With the withdrawal of Japan from the League of Nations in 1935, the islands were closed to Westerners and the military facilities expanded to include airfields, seaplane bases and some coastal defenses. The outbreak of war in 1941 soon saw the importance of the Palau Islands grow, as it soon became a forward supply, training and staging point for the Armed Forces.
The Americans Prepare
The next stage in the Central Pacific campaign under Admiral Chester W Nimitz was seen as supporting General Douglas MacArthur's drive to retake the Philippines as quickly as possible, something he managed to convince both Admiral Nimitz and President Franklin D Roosevelt of, during their meeting in Honolulu in July 1944. He managed to secure the loan (again) of the 1st Marine Division as he had done in the Solomons campaign. The 1st Marine Division had already received a warning order in May 1944 to participate in Operation Stalemate. This plan saw the 1st Marine Division with the 81st Infantry Division (under III Amphibious Corps) assault Peleliu and Angaur (also sometimes spelt Anguar), alongside the 7th and 77th Infantry Divisions (under XXIV Corps) that would land on Babelthuap, all part of the Palau Island group. The 27th Infantry Division would remain in reserve on New Caledonia and the target date was set as 8 September 1944.
The delays in securing the Marianas had three immediate impacts upon the Peleliu operation in that it firstly, delayed the arrival of the new III Amphibious Corps commander, Major General Roy S Geiger until planning (undertaken by a temporary staff headed by Major General Julian Smith commanding Task Force 36, called X-Ray Provisional Amphibious Corps) was at quite an advanced stage and any major changes would be difficult to implement. Secondly, it caused major friction between the Army and the Marine Corps as Lieutenant General Holland ("Howlin' Mad") Smith had relieved Major General Ralph C Smith of his command of the 27th Infantry Division for 'defective performance'. This was to have serious repercussions all the way back to Washington DC and on the Peleliu operation, although the two formation commanders would actually work very well together. Thirdly, it continued to tie up troops, resources and shipping (particularly the III Amphibious Corps and 77th Infantry Division on Guam and the 27th Infantry Division on Saipan). Additionally, intelligence (including the capture of the 31st Army files and a Japanese Intelligence Officer on Saipan) revealed that Babelthuap had only marginal utility in regard to the potential expansion of the airfield facilities there and had a large Japanese garrison, while Peleliu already had an excellent operational airfield that once in American hands, could neutralize the northern one. So the planning was altered and the target date (for the first phase) changed to 15 September 1944, the same day as MacArthur's forces would take Morotai. The new plan would be known as Operation Stalemate II, the first phase of which would involve the III Amphibious Corps (still the 1st Marine and 81st Infantry Divisions) assaulting Peleliu and Angaur. The second phase would see XXIV Corps (now consisting of the 7th and 96th Infantry Divisions) attacking the atolls of Yap and Ulithi on October 8th, while the 77th Infantry Division would become the operation's floating reserve and the 5th Marine Division acting as a general reserve on Hawaii. The two phases would be supported by the US Navy's Western Pacific Task Force from the Third Fleet. The Covering Forces and Special Groups (Task Force 30) would remain directly under Halsey, the Third Amphibious Force (Task Force 31) was divided into the Western Attack Force (Task Force 32) bound for Peleliu and Angaur under Rear Admiral George H Fort and the Eastern Attack Force (Task Force 33) bound for Yap and Ulithi under Vice Admiral Theodore S Wilkinson. Task Force 32 was itself split into the Peleliu Attack Group (1st Marine Division) directly under Fort and the Angaur Attack Group (81st Infantry Division) under Rear Admiral H P Blandly.
Halsey Steps In
Admiral William F 'Bull' Halsey, Commander of the Western Pacific Task Force, had overall responsibility for conducting supportive attacks against a number of Japanese bases both in the Palau Islands and in the Philippines. As these raids were taking place, the invasion force was heading towards Peleliu, but to Halsey's surprise, these raids were only lightly contested, making Halsey suspect that the Philippines (in particular) were not as heavily defended as first thought. He ordered his Chief of Staff, Rear Admiral R B Carney to send an urgent message to Admiral Nimitz just two days (13 September) before the assaults on Peleliu and Morotai were to take place, recommending that firstly, the assaults be abandoned, secondly, that the ground forces that were to be used be transferred to MacArthur for use in the Philippines and thirdly, that the invasion of Leyte be conducted at the earliest opportunity.
Nimitz in turn, quickly sent a message to the Joint Chiefs of Staff who were, at that point, meeting in Quebec for the Octagon Conference with President Roosevelt and Prime Minister Winston Churchill. The Joint Chiefs, after consultation with General MacArthur and Admiral Nimitz, decided on the 14 September (the day before D-Day) that the landings on Leyte should be brought forward by two months, thus accepting the third point in Halsey's recommendations. Halsey therefore, cancelled the second phase of Stalemate II on 17 September, with the exception of the landing on Ulithi, which would be now be carried out by the 323rd Regimental Combat Team (RCT), 81st Infantry Division. The XXIV Corps was transferred to MacArthur's command and landed on Leyte on 20 October 1944, fulfilling MacArthur's promise to return to the Philippines as soon as possible.
The Peleliu and Morotai assaults would go ahead however. While this would have no serious consequences for the 31st Infantry Division assaulting Morotai, the consequences for the 1st Marine and 81st Infantry Divisions would be severe. It was argued that the invasion forces were already at sea and the assault was on the verge of taking place and therefore too late to call it off, the Palau Islands had excellent airfields from which to threaten any invasion force for the Philippines and had a large number of first rate troops that could be used to reinforce them once the invasion was underway. Halsey would always disagree with this decision, claiming these factors could have been neutralised by air and sea bombardment, and whatever their value, the cost in taking them was likely to be too high. The controversy continues to this day.
Planning the Assault
The planning for the Peleliu assault was carried out by the 1st Marine Division's second-in-command, Brigadier General Oliver P Smith, as its commander, Major General William H Rupertus, was away in the United States for a considerable length of time. There were four beaches that the Marines could land on:
The pre-invasion bombardment would be conducted by the battleships USS Pennsylvania, Maryland, Mississippi, Tennessee and Idaho, the heavy cruisers USS Columbus, Indianapolis, Louisville, Minneapolis and Portland, the light cruisers USS Cleveland, Denver and Honolulu as well as the planes from three fleet carriers, five light carriers and eleven escort carriers. The bombardment was to start on D-3 (12 September) and continue just before the Marines landed, but on D-1 (14 September) Admiral Oldendorf stated he had run out of targets and sent a large number of these ships to the Philippines to support the landings there.
The initial assault would involve the three Marine regiments (1st, 5th and 7th) to land abreast on a 2,200-yard wide beachhead, each with one of their three battalions acting as a regimental and divisional reserve. The 1st Marines under Colonel Lewis B 'Chesty' Puller (less the 1st Battalion in regimental reserve), codenamed 'Spitfire', would land on the left flank on Beach White 1 and 2 and then push inland to a pre-determined point. It would then wheel left to attack the southwest end of the Umurbrogol Mountain, then push northeast along the coastal plain and 'high ground' (as intelligence described it) all the way to Ngesebus Island with the 5th Marines to their right. The 5th Marines under Colonel Harold D 'Bucky' Harris (less the 2nd battalion in regimental reserve), codenamed 'Lonewolf' would land on Beach Orange 1 and 2. The 1st Battalion would land on the left and link up with the 1st Marines, while the 3rd Battalion would drive eastwards across the airfield to the far shore.
The 2nd Battalion would then land at H+1 (one hour after the start of the assault, H-Hour), pass between the other two battalions and participate in the advance northeast. The 7th Marines under Colonel Herman H Hanneken (less the 2nd Battalion kept as divisional reserve), codenamed 'Mustang', would land on the right flank on Beach Orange 3, drive to the eastern shoreline and then wheel right to mop up the remaining enemy forces in the southwest of the island. The 11th Marines, reinforced with III Amphibious Corps' 3rd Howitzer (155mm) and 8th Gun (155mm) Battalions, would start landing on H+1 (one hour after the start of the assault, H-Hour) on the Orange Beaches. The 1st (75mm), 2nd (75mm) and 3rd (105mm) Battalions would support the 1st, 5th and 7th Marines respectively, while the 4th Battalion (105mm) would provide general support, as would the 155mm battalions.
The 81st Infantry Division would assault Angaur with the 322nd RCT landing on Beach Red to the north and then push inland to the south and west. The 321st RCT would land on Beach Blue to the east and push west and south, tying in with the 322nd RCT. Upon completion, the 81st would revert to III Amphibious Corps reserve, garrisoning both Peleliu and Angaur after they were declared secure.
The Assault Force
The two assault formations for Operation Stalemate II were the 1st Marine and 81st Infantry Divisions. The Marines would assault Peleliu itself while the Infantry would assault Angaur and Ulithi. The 1st Marine Division was raised in February 1941 from the 1st Marine Brigade, stationed at Guantánamo Bay, Cuba. It had fought on Guadalcanal, America's first amphibious landing of the war and secured a beachhead on Cape Gloucester, New Britain and fought there from December 1943 until February 1944. They then established a camp on Pavuvu in the Russell Islands, a small, inhospitable island some 35 miles northeast of Guadalcanal that was totally inadequate (initially anyway) as a base of operations and for training. They would reluctantly return there to prepare for Okinawa. Many of the veterans of Guadalcanal had rotated back to the USA, but some remained and most had fought on New Britain having fought in one of the wettest campaigns of the Second World War. The result of that campaign was that the division was in less than an ideal condition (many men suffering from weight loss and fungal infections) and had to absorb almost 5,000 replacements.
The division reorganized under the May 1944 TO&E, which saw the detachment of the 1st Amphibian Tractor Battalion to Fleet Marine Force control but it remained with the division and was eventually split three ways to form the 3rd Armored Amphibian Tractor (also known as Landing Vehicle, Tracked, LVT or amtrac) and 6th Amphibian Tractor Battalions (Provisional). Many of the personnel were drawn from the rear echelons of other amtrac battalions, Company C, 1st Motor Transport Battalion and the Tracked Vehicle School in the USA. Few LVTs were available to help train the three units but enough LVT(2)s and the new LVT(4)s existed to equip the units for the operation. As for the remainder of the 1st Motor Transport Battalion, Company A landed with its full complement of trucks and repair equipment, while Company B landed as litter bearers and relief drivers. There was also the deactivation of the 1st Special Weapons Battalion, which was spread among the infantry regiments. The scout company was detached from the tank battalion and redesignated the 1st Reconnaissance Company and assigned to the divisional headquarters battalion. 'Light' was dropped from the division's tank battalion as it received M4A2 Sherman medium tanks armed with 75mm guns and the companies changed from having three five-tank platoons to four three-tank platoons with three tanks in the headquarters. This allowed for a more flexible approach to assigning platoons to infantry battalions but with only three tanks, any combat losses could render the platoon ineffective. Company C of the tank battalion did not deploy due to restricted shipping space, but the crews were landed to serve as replacements. Thirty tanks were initially deployed but replacements did arrive as forty were knocked out during the battle and some twenty tanks were kept operational. The engineer regiment (17th Marines) was deactivated, and the component battalions being assigned to headquarters control (the Naval Construction Battalion or Seabees, returned to the Navy). The artillery regiment (11th Marines) lost its 3rd Battalion, which was rearmed with 155mm guns and placed under Fleet Marine Force control while the 5th Battalion became the new 3rd Battalion. Thus the 1st and 2nd Battalions were armed with 75mm M1A1 pack howitzers, and the 3rd and 4th Battalions were equipped with 105mm M2A1 howitzers. Finally, the infantry regiments were reorganized, each with a 261-man headquarters and service company (losing the scout and sniper platoon), a 203-man regimental weapons company and three 954-man infantry battalions. The weapons company had a platoon of four 75mm M3A1 halftrack-mounted guns and three platoons of four 37mm anti-tank guns each. The infantry battalions lost their weapons companies (D, H, M) - the mortar platoon (of four 81mm mortars) going to the headquarters company and the three heavy machine gun platoons were absorbed into the machine gun platoons of the rifle companies. The headquarters had twenty-seven M1A1 flamethrowers and twenty-seven demolition kits, one for each rifle squad. Sometimes the companies formed special assault squads armed with these weapons to attack enemy pillboxes or bunkers. For Operation Stalemate II, the division was given 100 60mm T20 shoulder fired mortars to issue to the platoons for use against caves and pillboxes. The rifle companies had a 53-man headquarters, three 46-man rifle platoons and 56-man machine gun platoon. The machine gun platoon had six .30cal M1919A4 air-cooled light machine guns, six .30cal M1917A1 water-cooled heavy machine guns, three 60mm M2 mortars (assigned to the company headquarters) and three 2.36in M1A1 rocket launchers. The rifle platoons each had a 7-man headquarters and three 13-man rifle squads. The rifle squads had a squad leader armed with an M1 carbine and three 4-man fire teams, each with a fire team leader (M1 rifle, M7 grenade launcher), rifleman (M1 rifle, M7 grenade launcher), automatic rifleman (M1918A2 Browning Automatic Rifle - BAR) and an assistant automatic rifleman (M1 carbine, M8 grenade launcher).
The 81st Infantry Division was made up of the 321st, 322nd and 323rd Regimental Combat Teams (RCTs) and was to assault both Angaur (321st and 322nd RCTs) and Ulithi (323rd RCT) but only when released by the 1st Marine Division commander. The 81st had been reactivated at Camp Rucker, Alabama in June 1942 after having previously served during World War One. It was raised from a small regular Army cadre from the 3rd Infantry Division, and filled out with newly commissioned reserve officers and conscripted troops. It received extensive desert training, participated in corps level exercises stressing the attack of fortified defensive positions, amphibious training in California, and was finally transferred to Hawaii where it undertook additional amphibious training. It was transported to Guadalcanal (by then a major US base) where it received jungle training, acclimatization and training in rugged terrain. Angaur and Peleliu would be its first combat action.
Army infantry regiments had a 108-man headquarters with a platoon of three 37mm M3A1 anti-tank guns and a intelligence / reconnaissance platoon, a 118-man canon company with six 75mm M1A1 pack howitzers, a 165-man anti-tank company with nine 37mm anti-tank guns with a mine platoon, and a 115-man service company. It had three 871-man infantry battalions, each with a 155-man headquarters, three 193-man rifle companies and a 160-man heavy weapons company (D, H, M) with eight .30cal M1917A1 heavy machine guns in two platoons, and six 81mm M1 mortars in another. Each rifle company consisted of three 39-man platoons, each having three 12-man squads with a squad leader (M1 rifle), automatic rifleman (M1918A2 BAR), assistant automatic rifleman (M1 rifle), grenadier (M1 rifle, M7 grenade launcher) and seven riflemen (M1 rifles). The company had five 2.36in M1A1 bazookas and a weapons platoon with a section of two .30cal M1919A4 light machine guns and a section of three 60mm M2 mortars. Army divisional artillery was organized in a different way to that of the Marines, in that a Brigadier General was in command, had three 105mm M2A1 howitzer battalions (316th, 317th and 906th Field Artillery Battalions) and one 155mm M1A1 howitzer battalion (318th). Each battalion had a headquarters and headquarters battery, service battery and three howitzer batteries with four tubes apiece. The divisional tank battalion was the 710th, had four companies, three with seventeen M4A1 Sherman tanks (three platoons of five and two in the headquarters), and a fourth with 3in gun armed M10 tank destroyers. It also had six 75mm M8 self-propelled howitzers in the assault gun platoon attached to the headquarters.
The assault force for Operation Stalemate II therefore numbered approximately 47,561 (2,647 officers, 44,914 men), of which 26,417 (1,438 officers, 24,979 men) were Marines.
The Japanese Prepare
The loss of the Marshall Islands and the bypassing of Truk and the Caroline Islands prompted the Japanese into a serious rethink of their defensive strategy as they were being pushed back on all fronts. These deliberations prompted the creation of an 'Absolute National Defense Zone', the equivalent of a 'line in the sand' that would be held at all costs and the Palau Islands became a part of that defense zone, initially under the command of the 31st Army headquartered in Truk (under Lt General Hideyoshi Obata), and subsequently transferred to the Southern Army in Manila (Field Marshal Count Hisaichi Terauchi). The islands already had some forces stationed there under the command of Major General Takso Yamaguchi, which consisted of the Sea Transport Unit of the 1st Amphibious Brigade, replacement units for the 20th, 41st and 51st Divisions, as well as supply and rear echelon units. These were formed into the 53rd Independent Mixed Brigade, consisting of a headquarters, five infantry battalions (346th, 348th, 349th, 350th and 351st), an artillery unit and an engineer unit.
To bolster the defences, both the 35th Division and subsequently the 14th Division were ordered to the Palau Islands - however, the 35th Division was redirected to New Guinea. The 14th was already en route to New Guinea but was then redirected to Saipan and subsequently to the Palau Islands. This was under the command to Lt General Sadao Inoue and was a veteran formation from the Kwantung Army with a distinguished history dating back to the Sino-Japanese War of 1894 - 5 and the Russo-Japanese War of 1904 - 5. It consisted of a headquarters, the 2nd (a 'heavy' Type A regiment), 15th and 59th Infantry Regiments (both Type B 'light' regiments), as well as numerous combat support, and combat service support elements. Inoue took command of the Palau Sector, which included Yap - defended by the 49th Independent Mixed Brigade and 46th Base Force - and Ulithi. He deployed the 15th Infantry Regiment (-3rd Battalion) and 59th Infantry Regiment (-1st Battalion) on Babelthuap, along with the 53rd Independent Mixed Brigade (-346th Independent Infantry Battalion). The 2nd Infantry Regiment, 3rd Battalion / 15th Infantry Regiment, 346th Infantry Battalion, the 14th Division's Tank Unit and other miscellaneous units were deployed on Peleliu (under Colonel Kunio Nakagawa) and the 1st Btn / 59th IR (Reinforced) defended Angaur under Major Ushio Goto. There were also numerous combat support and combat service support units that were organised into combat units once the invasion began.
The senior Imperial Japanese Navy commander for the Palau Islands was Vice Admiral Yoshioka Ito (sometimes spelt Itou and called Kenzo Ito which has created confusion) commanding the 30th Base Force. It is doubtful he was on Peleliu at the time of the battle as he survived to surrender Imperial Japanese Navy forces in the Palau Islands to the Americans in April 1945. Many references state that the overall naval commander for Peleliu was Vice-Admiral Seiichi Itou, but Jim Moran and Gordon Rottman argue that Vice-Admiral Seiichi Ito (not Itou) was in fact the Vice Naval Chief of Staff and in Japan at the time. He was in command of the battleship Yamato's suicide mission to beach itself on Okinawa and went down with the ship when it was sunk. No source can be found naming the senior naval commander on Peleliu.
The defense of Peleliu would be conducted with new tactics - no longer would the Japanese try and hold the landing beach in strength, where they could be subjected to fierce aerial and naval bombardment but would lightly defend the beach, construct a defense in depth utilizing the terrain to best advantage and counterattack on the first night while the Americans were still consolidating the beachhead. Additionally, there would be no mass suicidal banzai attacks, but carefully coordinated small-scale counterattacks - the Japanese planned to fight a war of attrition and bleed the Americans white.
The Japanese defenders numbered approximately 21,000 Army, 7,000 Navy and 10,000 laborers on the Palau Islands.
The Americans Move
After the time spent resting (or not as the Marines had to construct even the most basic of facilities, but at least there was some light relief as Bob Hope and his show stopped off before they departed) and training on Pavuvu, the Marines conducted two full-scale rehearsals on 27 and 29 August. This had naval gunfire to add realism but the Tassafarongo region on Guadalcanal lacked an inshore reef and so the hazardous task of transferring men and equipment from landing craft to amtrac could only be simulated. The practice landing resulted in a number of casualties from broken limbs, most notably Major General Rupertus who suffered a broken ankle. After this came an uneventful 2,100-mile voyage to the concentration area near the Palau Islands.
Starting on the 12 September, Underwater Demolition Teams (UDT) 6 and 7 had been clearing submerged obstacles and blasting pathways through the reef at Peleliu for the assault waves, while UDT 8 did the same on Angaur. This was often dangerous work and in many cases carried out under direct small arms fire from Japanese defenders on the beach. The Kossol Passage north of Babelthuap was cleared of mines at a cost of a minesweeper (USS Perry) with another minesweeper and a destroyer (USS Wadleigh) damaged.
Naval support ships began the pre-assault bombardment at 05.30, 15 September 1944, which moved inland at 07.50 to make way for carrier-based aircraft to bomb and strafe the beaches ahead of the lead assault wave. White phosphorous smoke shells were fired to screen the incoming Marines from the Japanese on the high ground to the north of the airfield. The initial assault waves would be landed entirely by amtrac, with subsequent waves transferring from LCVPs (Landing Craft, Vehicle and Personnel or 'Higgin's Boats' after their inventor, Andrew Higgins) at the reef's edge to amtracs returning from the beaches. This is basically a re-run of the plan for Operation Galvanic, the assault on Tarawa, and many a Marine must have thought about their comrades in the 2nd Marine Division who had had to wade ashore several hundred meters under intense fire from the Japanese. This time however, they would be preceded by LVT(A)1s, which mounted a 37mm gun, or LVT(A)4s, which mounted a 75mm gun and were specially armored amtracs that could act as tanks and suppress beach defenses. Additionally, there would be eighteen LCI(G)s (Landing Craft, Infantry (gun)), armed with 4.5in rockets and four LCI(M)s (Landing Craft, Infantry (mortar)) armed with three 4.2in mortars to give fire support to the assault troops. As the first waves crossed the line of departure, it became apparent that there were still plenty of defenders on Peleliu as artillery fire and mortar shells started to land in amongst the amtracs racing for the beach. A number received direct hits (some twenty-six were knocked out on D-Day) and the smoke and debris thrown up by both the American and Japanese bombardment obscured the beaches for a time from the following waves.
Hitting the Beach
The 3rd Battalion, 1st Marines (3/1) were the first to land, reaching Beach White 1 at 08.32 with the 2nd Battalion (2/1) on its right (White 2) and 1st Battalion (1/1) due to arrive at 09.45 as regimental reserve. 2/1 advanced some 350 yards with the support of the armored amtracs, at which point their Sherman tanks had arrived ashore. They stopped at the far side of some woods, facing the airfield and its buildings, having linked up with the 5th Marines. 3/1 faced stronger opposition than 2/1 and after it had advanced 100 yards faced an extremely formidable obstacle, a 30-foot high rough coral ridge (nicknamed 'The Point'), which had not been on any map and was covered with caves and defensive positions that the Japanese had blasted into the ridge. It resisted all initial assaults and even after tank support had arrived, the assaulting troops ran into a large anti-tank ditch that was dominated by the ridge and the Marines were pinned down for hours. A and B Companies of 1/1 were committed in support but it wasn't until late in the afternoon that a foothold was gained on the southern part of 'The Point'. A number of LVTs had been hit on the way in and this had badly disrupted the 1st Marines command group. As a result, two serious gaps had started to appear in the 1st Marines lines and the division headquarters only slowly became aware of it. Every available person (including headquarters personnel and 100 men from the 1st Engineer Battalion) was drafted to fill them and they formed a defence in depth against any possible Japanese counterattack, that could have rolled up the line and attacked onto a congested beach. Eventually, some Marines from Company K (K/3/1), under Captain George B Hunt managed to fight their way inland and attack 'The Point' from the rear. They fought their way along it for over two hours. They then came to the main defensive installation, which was a reinforced concrete casement that was armed with a 25mm automatic cannon and had been raking the beach all morning. Lieutenant William L Willis dropped a smoke grenade to cover the attack while Corporal Anderson managed to launch a rifle grenade through the firing aperture that damaged the gun and set off the ammunition. Any surviving defenders were taken care of as they left the position. Captain Hunt and his thirty surviving men spent the next thirty or so hours beating off attempted Japanese infiltrations.
The 5th Marines landed on Beach Orange 1 (1/5) and 2 (3/5) and meeting only scattered resistance, advanced inland through coconut groves and reaching their first objective line by 09.30 and tying up with 2/1 on their left. There was some confusion on Orange 2 as elements of the 7th Marines landed there instead of their intended beach (Orange 3) and so the 3rd Battalion's K Company (K/3/5) was delayed in its advance and did not draw level with I/3/5 until 10.00. After 3/5 resumed the advance at 10.30, there was again some confusion between its companies as K/3/5 forged ahead of I/3/5 as it was in dense vegetation that provided concealment from Japanese shelling. L/3/5 was committed to close the gap but the line remained thin for much of D-Day. 2/5 had landed at 09.35 and drove east and they were deployed to relieve I/3/5 who were to pass around L/3/5 and tie in with K/3/5. Orders proved easier to give than to execute and it took sometime to accomplish this. To underscore 3/5's bad luck, a mortar barrage hit the battalion command post (CP) and Colonel Shofner and a number of his staff were wounded and had to be evacuated, forcing Lieutenant Colonel Lewis W Walt, the battalion's Executive Office, to take command.
The 7th Marines landed on Beach Orange 3, with two battalions (1/7 and 3/7) in column, and 2/7 being kept afloat as division reserve. 3/7 landed first but experienced difficulties with a high number of natural and man-made obstacles on the reef, which forced the amtrac divers to approach it in column, presenting a prime target to the Japanese gunners. The ferocious fire that came in forced a number of amtrac drivers to veer left and land on Orange 2. The confusion between 3/7 and 3/5 took time to rectify and when it finally moved off inland it discovered another large obstacle in the form of a huge anti-tank ditch, which the Marines quickly put to good use. By 10.45 3/7 had covered some 500 yards when it ran into a series of blockhouses and pillboxes in the old Japanese barracks area. It requested tank support, which when it arrived, became confused and ended up supporting 3/5 instead of 3/7 as they were adjacent to each other. This led to a gap opening up between the two regiments as 3/7 had stopped to consolidate its position whereas 3/5 continued to push ahead. 1/7 landed on Orange 3 at 10.30 and wheeled right as planned, only to encounter a dense swamp (not shown on any map), which had the only trail around it heavily defended. It wouldn't be until 15.20 that Colonel Gormley could report that the battalion had reached its objective line and it faced a determined Japanese counterattack that night, which was only defeated with the help of Black Marine shore party personnel who volunteered to become riflemen.
While there were a number of local counterattacks that night, none were of the old suicidal banzai variety. Instead they took a more coherent form of carefully planned attempts at infiltration and raiding. The only major counterattack of the day came in at 16.50 and consisted of a combined tank - infantry force that crossed the northern part of the runway. Initially, an infantry force started to move towards Marine lines under the cover of a significant increase in artillery fire and was soon followed by a group of tanks with infantry riding on them. For a moment, this looked like a serious coordinated attack but then for some reason the Japanese tank drivers accelerated towards the Marines, leaving the infantry in their wake. They cut across the front of 2/1 who subjected them to devastating flanking fire. Two of the tanks veered off and went through 2/1's lines and crashed into a swamp while the others went through the lines of 1/5 and were cut to pieces. The advancing infantry was subject to harassing fire and the attentions of a Navy dive-bomber. Only two tanks escaped (these were probably destroyed in a later counterattack) and the infantry disappeared after seeing their tank support decimated.
Preparing for the Meat Grinder: D+1 to D+7
Major General Rupertus and his staff landed at 09.50 on D+1 (16 September) and took over the command post set up by General Smith in the large anti-tank ditch. They immediately set to work on the next phase of the campaign based on the original battle plan, despite the fact that few of the original D-Day objectives had been met and the 1st Marines were in serious trouble on the left flank.
On the right, the 7th Marines continued their advance south and east. 3/7 continued their assault eastwards on a large Japanese reinforced concrete blockhouse with the aid of naval gunfire support and artillery, but had to finally reduce it by direct assault under cover of a smokescreen. 1/7 attacked south over flat scrubland that slowed progress. Most of the defenses in this area were geared to a possible assault from the sea, but the Marines still faced a large number of casemates, bunkers, blockhouses, pillboxes, rifle pits and trenches, all mutually supporting with well-cleared fields of fire. It took most of the morning on D+1 for K/3/7 to reach the far shoreline. It must be noted that the temperatures on Peleliu were not comfortable at all, with it being over 100° F and the strains of protracted fighting and dehydration would soon be felt. The advance was halted at noon, with the rest of D+1 taken up with bringing forward and stockpiling fresh supplies and water. Unfortunately a number of the drums used to hold the water had previously been used to store aviation fuel and a large number of Marines were temporarily incapacitated.
D+2 saw the 7th Marines continue their assault to the south and southeast with 3/7 taking the Southeastern Promontory by 13.20 after some fierce fighting and the clearance by Engineers of a minefield that delayed the attack. 1/7 started their assault on the Southwestern Promontory (much larger than the southeastern one) at 08.35 and met stubborn resistance from the beginning and had to call in tanks and armored LVT(A)s to help the advance. They managed to take the first line of the Japanese defenses by mid-afternoon but only managed to clear half the promontory by nightfall. They resumed the attack at 10.00 on D+3 but progress was slow (even though additional armour and 75mm gun armed halftracks had been brought up) with many rear echelon elements being attacked by Japanese emerging from bypassed caves and fortifications. It wasn't until mid-afternoon that the Marines had reached the southern shore and the remaining Japanese decided to take their own lives and save the Marines the trouble. The southern part of Peleliu had been secured.
Meanwhile, the 5th Marines prepared to continue to advance east and then swing northeast to stay on the right flank of the 1st Marines. In a short space of time, 1/5 swept the whole of the northern part of the airfield with the only serious resistance coming from a collection of emplacements around the hangars. The area was secured by the end of D+1 after heavy fighting and an adjustment in the frontline. 2/5 (to the right of 1/5) was making slow progress over what was relatively open ground due to heavy resistance. To the east of the airfield, woodland gave way to a mangrove swamp that were all infested with Japanese fortifications and it took hours of hand-to-hand fighting for 2/5 to draw next to 1/5. With the advances of the 7th Marines on their right flank and the 2/5 on its left flank, 3/5 was almost pinched out of operations by the end of D+1 and halted to secure its positions on the shoreline. D+2 saw the 5th Marines start moving northeast where they came under flanking fire from Japanese positions in front of the 1st Marines. 1/5 reached its objectives by noon but when 3/5 relieved it and tried to continue the advance, it became pinned down. 2/5 however had greater success, being concealed by woodland, and with resistance being light quickly drew level with 3/5 on its left and the shoreline to its right. D+3 (18 September) saw the 5th Marines make slow but steady progress. The regimental boundary (on their left) was the road that ran past the Umurbrogol Mountain to the northeast. 2/5 hacked its way through dense jungle terrain to eventually come across an improved road that split, in one direction running east towards Ngardololok and in the other running northeast past the Kamilianlul Mountain and Hill 80 before it joined another road running along the other shoreline past Garekoro. As it ran east, this road ran very close to the swamp and in places could have been considered a causeway that would be perilous to advance up. A patrol was sent in advance of the main body that was covered by artillery and air strikes, one of which came in late and hit the Marines, resulting in thirty-four casualties. With this opening, Regimental HQ shifted 3/5 (minus L Company tied in with the 1st Marines) along the road to support 2/5, which faced the main Ngardololok installations, usually referred to as the 'RDF' as it contained a radio direction finder station. Both battalions advanced on the RDF and by the end of D+4 had reached the eastern and southern shores (Beach Purple). By the end of D+5 they had secured the entire eastern peninsula with 2/5 advancing all the way up to Ngabad Island and then moving across to Carlson Island by D+8.
On the left flank, things were far from going to plan. The 1st Marines under Puller had met fierce and coordinated resistance from the first moments they landed. On D+1, the divisional reserve 2/7 was ordered to support the 1st Marines. 2/1, which faced east, swung north to attack the built-up area that lay between the airfield and the mountains. 3/1 however, was not able to match this and therefore 1/1, the regimental reserve, was landed to give support. After hard fighting, the 1st Marines finally captured 'The Ridge' and relieved Company K, which had been reduced to 78 men from 235. On D+2, the 1st Marines came into contact with the Umurbrogol Mountains and described it thus - "a contorted mass of coral, strewn with rubble crags, ridges and gulches." By this time the 1st Marines had suffered over 1,000 casualties, but all three battalions now lined up with 3/1 on the left, 1/1 in the centre and 2/1 on the right with 2/7 in reserve. 2/1 was the first to advance and engage the defences. They attacked and took the first of many ridges (this one called Hill 200) but immediately came under fire from the next one (Hill 210). 1/1 made good progress until they came up against a reinforced concrete blockhouse that had been reported as destroyed by Admiral Oldendorf. The Marines only took it after calling in 14in naval gunfire directly onto the fortification. 3/1 advanced along the comparatively flat coastal plain, but halted when it started to loose contact with 1/1. Casualties quickly rose but Puller was being urged on by Rupertus to 'maintain momentum' and so just about everyone who could hold a rifle was put into the line as infantry, including engineers, pioneers and HQ personnel. 2/7 moved into the line to replace 1/1. The pattern for D+2 was to be repeated again and again. On D+3 the Marines took Hill 210, but the Japanese counterattacked Hill 200 forcing them to withdraw. The situation looked desperate and so B/1/1 who had just entered reserve, was ordered to re-enter the line and help 2/1 take another ridge (Hill 205). This they accomplished, but when they tried to advance, they were halted by a collection of emplacements and fortifications that came to be known as the 'Five Sisters'. 3/1 advanced along the coastal plain once again, halting to maintain contact with 2/7. After a night of concerted counterattacks, the remnants of the 1st Marines and 2/7 resumed their attacks on what was now obvious to everyone - the main Japanese line of defense - and while making progress suffered heavy casualties. By the end of D+4, the 1st Marines were no longer capable of effective action, having suffered some 1,749 casualties - only six fewer than what the 1st Marine Division had suffered in its entirety on Guadalcanal. Having visited the 1st Marines, Roy Geiger (Commander, III Amphibious Corps) ordered Rupertus to replace the 1st Marines with the 321st RCT, 81st Infantry Division (on Angaur) and send the 1st Marines back to Pavuvu.
'A Horrible Place' to Fight
D+6 saw the completion by Navy Seabees on Beach Orange 3 of a pontoon causeway that would facilitate the unloading of equipment and supplies as it bridged the reef that was impassable to the large LSTs (Landing Ships, Tank). D+8 (23 September) saw 2/5 secure the small island, later named Carlson Island, to the north of Ngabad Island. It also saw the Japanese reinforce the beleaguered garrison on Peleliu with virtually a whole battalion's worth (2nd Battalion, 15th Infantry Regiment) of fresh troops that landed by barge from Babelthuap, after two previous attempts had been turned back by the Americans. The need to secure northern Peleliu was now evident.
D+9 saw the 321st RCT, having arrived from Angaur (Angaur being declared secure at 10.34, 20 September, although the 322nd RCT would be fighting there for another month in 'mopping up' operations), drive north past the Umurbrogol Mountains, the plan being for the 321st RCT to push past them, with the 5th Marines moving through them and securing northern Peleliu while the 7th Marines took over the 1st Marine's positions. However, the Japanese still held positions all along the edge of the road and would bring down fire on anything that tried to move along it. The terrain also made it impossible for any tanks or armoured vehicles to move in support of infantry, except along the road. D+9 also saw Marine Air Group 11 start to arrive that would take over the air support for the operation from the Navy.
As the 321st RCT advanced (having taken over from 3/1 that had been tied to 3/7 to their right) they outpaced the 3/7 by keeping to the road, 3/7 having to take the ridges themselves. The 321st RCT continued to advance and by D+10, the 5th Marines were able to pass through them and move onto the ruined village of Garekoru. There, 1/5 occupied the destroyed radio station to the north of the village and 3/5 took the high ground on their right flank after a hard but short fight from Navy construction personnel.
D+11 saw an assault begin on 'Hill Row' made up of Radar Hill, and Hills 1, 2 and 3, in actuality the southern arm of the Amiangal Ridge. Here, 1/5 and 2/5 started the attack, but as it progressed, 2/5 shifted west and continued north while 1/5 and 3/5 continued to attack eastwards, 3/5 taking Hill 80 and reaching the shoreline by the end of the day. Fighting continued on D+11 and D+12 but by the end of D+12 (27 September), 2/5 had secured the northern shore (Akarakoro Point) and the phosphate plant, although it would take another several weeks to finally eliminate all resistance on the Point, by blasting shut the cave entrances. Even then, a few weeks later, the Marines were astonished to see Japanese Navy survivors dig their way out! 2/5 then turned around and attacked south in support of 1/5, still assaulting Hill Row. After two more days of fierce fighting, they had reached the tops of Hill Row, with only the Umurbrogol Pocket left. Meanwhile, 3/5 assaulted Ngesebus Island on D+13 to seal off Peleliu from further reinforcement from Babelthuap. They were supported by the battleship USS Mississippi, the cruisers USS Columbus and USS Denver, land-based artillery and Marine Corsairs from VMF-114. 1/7 was in reserve. The landing (at 09.30) was met with little resistance. Ngesebus is mainly flat and covered with scrubland but has some coral ridges to the west. This was where the Japanese had there main defence line, but it wasn't as well constructed as those on Peleliu, and with the support of tanks, 3/5 had cleared both Ngesebus and Kongauru Island by the end of D+14 and turned them over to 1/321, going into divisional reserve.
Reducing 'The Pocket'
With the north of Peleliu secure, the only part still in Japanese hands was the pocket of resistance centered on the Umurbrogol Mountains in an area of about 1,000 yards by 500 yards, running from Baldy Hill in the north to Five Sisters in the south. The 7th Marines continued to press from the south and west while 2/321 and 3/321 pressed from the north, having taken over from the 5th Marines. Hill B, which had stalled 321st RCT's attack, was finally taken on D+11 by 2/321with the help of a specially formed unit, called 'Neal Force' made up of seven Sherman tanks, six LVTs, an LVT flamethrower and forty-five riflemen. On D+14 the 7th Marines were tasked with relieving 2/321 and 3/321 but in order to release 1/7 and 3/7 from their holding positions, two composite units made up of drafted support personnel were formed, to take up positions alongside 2/7 and a weapons company. Also, the 1st Tank Battalion was withdrawn by Major General Rupertus, who considered tanks to be of little use in the fighting ahead, despite the objections by the second-in-command, Brigadier General Oliver P Smith. Added to that a typhoon appeared and lasted for three days in which the Americans had to organize emergency supply flights by C-46 and C-47 aircraft, as it was impossible for them to land supplies on the beach. While the rain reduced the temperature, it turned the dust into mud making movement difficult over most of the island.
1/7 and 3/7 relieved 321st RCT on D+14 and on D+15 renewed the assault southwards, managing to take part of 'Boyd Ridge' and Hill 100 (also sometimes called Pope's Ridge or Walt Ridge). 3/5 (back from Ngesebus) reinforced the 7th Marines on D+18 and so the regiment planned a four-battalion attack. 1/7 (along the East Road towards the unnamed ridge) and 3/7 (towards Baldy Hill) would attack from the north. 2/7 would attack towards Hill 300 from the south and 3/5 would make a diversionary attack towards Five Sisters and Horseshoe Canyon from the west. After bitter fighting and heavy casualties, the assault managed to secure its objectives with the exception of the Five Sisters, where 3/5 had managed to scale four out of the five heights but had to retreat as its position was untenable. It was on D+18 that the Marines suffered their highest-ranking casualty - Colonel Joseph F Hankins, who had come down the West Road to clear a traffic jam near a dangerous part of the road called 'Dead Man's Curve', and was killed by a sniper.
The 7th Marines had been in the Umurbrogol for two weeks and were looking severely battered as a result. D+19 saw their final attack get underway to mop up the draw between Walt (also known as Hill 100) and Boyd Ridges, which were assigned to I/3/7 and F/2/7. Company L under Captain James V Shanley was tasked to seize three semi-isolated hills east of Baldy. The company achieved this with no casualties and so continued to advance onto Ridge 120. Just as the lead platoon reached to northern tip of the ridge, Japanese opened up with automatic fire from emplacements on Baldy and the lower slopes of Boyd Ridge. As the Marines retreated they walked into an ambush - a hail of fire from positions on the captured knobs and the lower slopes of Ridge 120. It was all over by 18.20 - only five Marines out of the forty-eight in the platoon made it back unhurt. The 7th Marines were no longer an effective fighting force having suffered 46 percent casualties (1,486 out of 3,217). They were pulled out of the line and replaced by the 5th Marines, 1/5 taking over from 2/7 and 2/5 taking over from 3/7, while 3/5 withdrew to a bivouac area to prepare for up-and-coming operations.
Bulldozers were brought up to clear routes into the many canyons to allow flamethrower-equipped LVTs and tanks to support the advance and artillery was positioned on the West Road to fire at point-blank range at the west facing cliffs. These tactics continued, slowly reducing the pocket, for the next six days. Hill 140 was captured in a well-orchestrated attack from 2/5 that allowed a 75mm pack howitzer to be brought up, sandbagged in place, and fire on many of the larger caves that had been firing to such devastating effect on the attacking Marines. D+27 saw 3/5 relieve 2/5 and continue the attack from the southeast, gradually reducing the Pocket to an area 800 yards long by 500 yards wide.
Rupertus had been resisting suggestions by Major General Geiger to relieve the 5th and 7th Marines with the 321st RCT but Rupertus desperately wanted the Umurbrogol Mountain to fall to the Marines and limit the Army's role to mopping up only. Events however, overtook him with first, the arrival of the 323rd RCT from Ulithi and secondly the replacement of Admiral Wilkinson by Admiral Fort who promptly sent a communiqué to the effect that Peleliu had been secured and that the 1st Marine Division would be withdrawn to Pavuvu, the assault phase of Operation Stalemate II complete. Over the course of D+31 / 32 the 321st RCT relieved the 5th Marines while the 323rd RCT relieved the 7th Marines. A number of Marine units (including the 1st Amphibian Tractor, 3rd Armored Amphibian Tractor and 1st Medical Battalions) stayed on to support the 81st Infantry Division in a battle that lasted another six weeks. Japanese defenses were now concentrated in individual positions around Baldy, Hill 140, Five Brothers, Five Sisters and the China Wall. The Army continued to pound the Japanese, and reduce each position carefully with intense preparatory work. The 321st RCT continued the attack and took the Five Brothers and entered the Horseshoe on 23 November. 323rd RCT (under Colonel Arthur Watson) took Hill 30 and Five Sisters and after assuming the main responsibility for finishing the attack, started their assault on the China Wall, only yards from Nakagawa's command post in what was to be the last Japanese position on the island to fall. Engineers constructed a ramp to allow tanks and flame-throwing LVTs to fire directly onto the last Japanese defenses now only a couple of hundred yards square. On D+70, Colonel Nakagawa sent one last message to Koror advising them that he had burned the 2nd Infantry Regiment's colors and split his remaining 56 men into 17 groups with orders to attack the enemy wherever they found them. That night, 25 Japanese were killed attempting to infiltrate American lines and the following morning, a prisoner confirmed that Colonel Nakagawa and Major General Murai had both committed ritual suicide in their command post. On the morning of D+73 (27 November), elements from the north and the south met face-to-face near what was Nakagawa's final command post. Colonel Watson reported to Major General Mueller that the operation was over, although mopping up would continue for some time to come.
The Aftermath
The cost was staggering. The Marines suffered 1,300 dead, 5,450 wounded and 36 missing. The 1st Marines suffered 1,749 casualties, the 5th Marines suffered 1,378 and the 7th Marines suffered 1,497. The Army suffered 1,393 casualties (208 killed) on Peleliu and 1,614 casualties (260 killed) on Angaur. The Japanese lost an estimated 10,900 personnel, including those lost at sea in reinforcement attempts. 202 prisoners were taken, of which 19 were Japanese, the rest being Korean or Okinawan laborers. Only 39 prisoners were taken on Angaur with the rest of the 1,400-man garrison being wiped out.
One mystery surrounding Peleliu was the role played by Major General Kenjiro Murai. Captured orders and interrogation of POWs indicated that Colonel Nakagawa was in command and that Murai was there as an advisor as he was considered an expert in fortifications. This was an unusual situation to say the least given the disparity in rank, strict Japanese military code and the fact that Peleliu was a large command for a colonel. In March 1950, Lt Colonel Worden, USMC, interrogated General Inoue, who survived the war, while he was in a US Navy prison. Inoue's statement, plus captured material from the Japanese Ministry of Foreign Affairs confirmed that Murai was definitely on Peleliu during the fighting and that both he and Nakagawa received special promotions on 31 December 1944, the day that the Japanese High Command accepted their deaths. There was however problems between the Army and the Navy and it is possible that Inoue sent Murai there to bolster Nakagawa's authority as the Army were finding it difficult to obtain any sort of real cooperation from the Navy. However, a Navy vice-admiral still outranks an Army Major General, although not by nearly as much as a colonel.
For months afterwards, US garrison troops were flushing out survivors and sealing up caves. The huge tunnel complex in the Umurbrogol was still occupied and after attempts were made to persuade the Japanese to surrender, the caves were sealed shut, only to have five bedraggled survivors dig their way out in February 1945. For a while after the end of the Second World War, rumors persisted about surviving Japanese soldiers still hiding out in the mountains and swamps of Peleliu. Eventually some 120 Marines were sent in to look for them, as they might be preparing to attack Navy dependent housing. After several attempts to persuade them to give themselves up failed, a former Japanese Admiral was brought to Peleliu to talk them into surrendering and that they could do so with honor. On 22 April 1947, a lieutenant with twenty-six men from the 2nd Infantry Regiment and eight from the 45th Guard Force sailors emerged - their battle for Peleliu finally at an end. This was the last official surrender of World War Two, although the last reported Japanese soldier actually surrendered in 1955!
Navy Seabees started constructing a 7,000-foot runway on Angaur even before the fighting had finished, from which Marine aircraft wings (eventually VMF-114, VMF-121, VMF-122, VMTB-134, VMF(N)-541 and VMR-952 would be based there) started flying to support the troops still battling for the island. It was eventually used by 494th Heavy Bombardment Group flying B-24 Liberators to support American forces fighting in the Philippines as well as two US Navy sea search units, one of which found the survivors of the USS Indianapolis (CA-35) that delivered parts for the atomic bomb to Tinian and was torpedoed by a Japanese submarine (I-58) as it headed for Leyte. The ship went down in twelve minutes and no report of its sinking or a distress call was received. Out of a crew of 1,196, 316 were still alive by the fourth day when they were spotted by a search plane operating out of Peleliu.
Conclusion
A number of lessons needed to be learned in regard to the Peleliu operation. The first was in regard to replacement combat troops. Two 150-man replacement companies were available to the 1st Marine Division and were attached to the 1st Pioneer Battalion as Companies D and E to assist with unloading until D+3 (19 September) when they were released to the regiments. Even by that point, they proved inadequate to replace the losses suffered in the battle. No other replacements were available to the division, which was eventually forced to hand over the battle to the Army's 81st Infantry Division between 15 and 20 October. Two approximately 1,350-man replacement units were available to each Marine division at Iwo Jima, but even these were inadequate.
The second was in the provision of adequate medical care. The 1st Marine Division relied on organic support with each infantry battalion having a 44-man aid station (two officers, forty-two enlisted) that were in fact Navy personnel. Medical corpsmen were attached to the platoons an also operated small aid stations for the rifle companies. The infantry regiments also had aid stations with twenty-four personnel (five officers and nineteen enlisted) in them and a 102-man medical company attached to the division, which provided small clearing stations to support each battalion aid station. This provision was stretched given the casualty rate suffered by the division in the battle.
The third relates to the use of metal drums for both fuel and drinking water. An unfortunate incident occurred where a number of drums that were carrying water had not been cleaned properly after they had been used to store aviation fuel, which resulted in a number of needless casualties from sickness.
The fourth relates to the inadequate pre-invasion bombardment. Documents recovered on Saipan indicated the true numbers of Japanese defenders on the islands, previously thought to be far less than the 10,000+ men actually deployed there. The planners added a third day of naval bombardment to the schedule, which showed they took heed of the intelligence from the Marianas but they failed to assimilate the lessons from previous operations about the consequences of an inadequate pre-invasion bombardment, shown as recently as the battle for Saipan. Worse was to come when the admiral in charge of the fire support ships informed the landing force that he had run out of targets and reduced his expenditure of shells for the time remaining. The reception received by the Marines as they landed on the invasion beaches on D-Day testified to the poor performance of the Navy in destroying the Japanese defenses and it also failed to remove much of the jungle that covered many areas behind the beach. It is therefore vital to make sure that there is an adequate process in place to facilitate the dissemination of important information, intelligence and lessons learned to all concerned.
Fifthly, there is the difficulty of gathering intelligence in a high-threat amphibious scenario. The reconnaissance assets employed at the time failed to pick out many of the camouflaged emplacements, bunkers, blockhouses and caves that littered the island and provided little clue as to the nightmarish terrain that was hidden under the thick jungle canopy. While such assets have advanced massively since the end of the Second World War, it would be interesting to see if our modern technology and reconnaissance techniques would have any greater success against such an opponent that is willing to extract the most out of deception, camouflage and the use of local terrain to maximum advantage. Experience in the recent Kosovo conflict suggests that it would be wise not to become over-reliant on such advanced technology. There is also the possibility that the actual use of reconnaissance assets may warn one side that the other has an interest in a particular target.
Whether or not the islands should have been taken is a matter that is still hotly contested by veterans and historians alike. Whatever the arguments, it must be remembered that:
• General Douglas MacArthur's flank was secured for his return to the Philippines and the danger posed by airstrikes or troop reinforcements from the Palau Islands were removed.
• Several thousand of the best Japanese troops had been eliminated and the remaining troops in the Western Carolines could be effectively contained with air and naval power from the bases on Peleliu and Angaur.
• This operation served as an early indicator to the change in Japanese tactics that would be seen in other operations to come (such as Iwo Jima and Okinawa) and of what to expect in the planned invasion of the Japanese homeland (Operation Downfall).
General Clifton B Cates, who after World War Two became Commandant of the US Marine Corps, suggested that Peleliu was one of the most vicious, stubbornly contested and least understood battles of the war - a significant appraisal coming from a veteran (wounded six times) of the battles for Belleau Wood and Soissons during the First World War and of Guadalcanal and Iwo Jima in the Second. Major General Roy Geiger called Peleliu 'the toughest fight of the war". Harry Gailey exclaims, "in terms of heroism, every man who fought at Peleliu deserved the highest awards his country can bestow." Eugene Sledge wrote that it was a "nether world of horror from which escape seemed less and less likely as casualties mounted and the fighting dragged on and on. Time had no meaning; life had no meaning. The fierce struggle made savages of us all." Leon Uris states "the Marine battle for Peleliu was one of the most savage of the Second World War." Tom Bartlett (Managing Editor, Leatherneck) said "Peleliu . . . shows perhaps more than any other World War II invasion, the true mettle of the Marines and their devotion to each other, their units, and the Corps."
It remains a mystery to many as to why this battle has not taken its rightful place among the Corps' most famous engagements. Perhaps it was looked upon as a sideshow in comparison to MacArthur's much-heralded return to the Philippines, or the Allied campaign in France and the Low Countries (D-Day for Peleliu being two days before the start of Operation Market Garden), or perhaps it was the fact that few correspondents went ashore on Peleliu (due to Major General Rupertus' prediction that it would be over in four to five days) or perhaps it was the Marine Corps itself who preferred the battle to be downplayed after they had come in for criticism from both the Army and the Press over the high casualties at Tarawa, Kwajalein and Saipan. Whatever the reason, Peleliu should now be a battle that, in the words of Major Henry J Donigan, is "studied, honored and remembered". Perhaps the last words should go to Eugene Sledge. The Americans soldiers, sailors, airmen and marines who fought there he says, "suffered so much for our country. None came out unscathed. Many gave their lives, their health, and some their sanity. All who survived will long remember the horror that they would rather forget. But they suffered and they did their duty so a sheltered homeland can enjoy the peace."
Credit: Antill, Peter (2003), Peleliu, Battle for (Operation Stalemate II) - The Pacific War's Forgotten Battle, September-November 1944
http://www.historyofwar.org/articles/battles_peleliu
Map 1

Map 2
Log

Leyte Operation
Leyte landings, 13 to 21 October and 19 November 1944.
Close
Battle
Battle of Leyte Gulf
Introduction
The Battle of Leyte Gulf (22-26 October 1944) was one of the largest and most complex naval battles in history and ended as a massive American victory that effectively destroying the fighting capability of the Japanese navy.
American Plans
The American plans had evolved significantly during the summer of 1944. The original plan had been for a landing on Mindanao, the southernmost of the main Philippine islands. Next would be a larger scale invasion of Leyte, nearer the center of the islands and then the invasion of the largest of the islands, Luzon. In mid-June the Joint Chiefs of Staff suggested abandoning the invasion of Luzon and instead going straight from Leyte to Formosa. Unsurprisingly this angered MacArthur, who had promised to return to the Philippines after being forced to leave the islands in 1942. In late July MacArthur, Nimitz and Roosevelt met on Hawaii, and the invasion of Luzon was confirmed. The campaign in the Philippines was to begin in December 1944.
Preliminary operations began on 6 September when aircraft from Admiral Mitscher's Task Force 38 bombarded the Palau Islands, 550 miles to the east of Mindanao. That island was attacked on 9-10 September, triggering a false invasion alarm. Next came an attack on the Visayan Islands, in the center of the Philippines. This went so well that Admiral Halsey, commander of the US Third Fleet, suggested a new plan. Instead of waiting until December and then carefully advancing from south to north through the Philippines, he believed that the Japanese were so off balance that an almost immediate invasion of Leyte would be a success. This suggestion reached Roosevelt and Churchill while they were meeting at Quebec. The two leaders were in favor of this daring idea, but MacArthur was un-contactable, having decided to accompany a force that was about to attack Morotai and that was operating radio silence. MacArthur's chief of staff made the decision for him and approved the new plan. Leyte would be invaded on 20 October.
MacArthur's troops were to land on the good beaches on the east coast of Leyte. The engineers would then build airfields on the difficult ground inland and they would be used to support both the fighting on Leyte itself and the landings on Luzon. The 7th Fleet would provide direct support, both from the big guns of the battleships and cruisers and from the aircraft on the escort carriers. The 3rd Fleet would provide cover against any attempt by the Japanese navy to intervene.
The Japanese Plan
The Japanese also spent the summer of 1944 working on a grand plan. They were now entirely on the defense, and so Operation Victory (Sho-Go) was a defensive one. The Japanese high command decided that four different American moves were possible - an invasion of the Philippines or Formosa in the south, the Kuriles in the north or even a direct attack on the Home Islands. In the south Sho-1 was the defense of the Philippines and Sho-2 the defense of Formosa. As had happened repeatedly since Pearl Harbor the Japanese were obsessed with the idea of the 'decisive battle', a single massive battle that if it ended in a Japanese victory could save the day.
By the autumn of 1944 the Japanese fleet was widely scattered. The main battle fleet was based at Lingga, a small island east of Sumatra and south of Singapore. This location had been chosen because it put the fleet close to its main sources of fuel. The carrier force had retreated to the Inland Sea in the Japanese Home Islands where new naval aviators were being trained.
The Sho-1 plan took advantage of this deployment. Admiral Ozawa with his force of carriers was to approach the Philippines from Japan. His role was to pull the main American carriers and fast battleships away from Leyte Gulf leaving the invasion fleet vulnerable to attack. Ozawa's northern fleet was being deliberately sacrificed in an attempt to win a decisive battle. He had the carriers but he didn’t have trained naval aviators, so his ships were effectively toothless. Ozawa's original role had been to take part in the main battle, but after the destruction of his last effective air groups in mid-October he suggested the diversionary tactic.
The main fleet at Lingga was to split into two. Admiral Kurita was to take the largest and most powerful part of the fleet, I Striking Force, through the middle of the Philippines. He was to emerge from the San Bernadino Strait, north of Leyte, and sweep south to attack in the invasion fleet. Kurita objected to the plan - not because he saw any flaws in the operation itself, but because he didn't see the point in risking the entire fleet for an attack on transport ships that would probably already have been loaded when the Japanese arrived. His objections were overruled.
The second part of the main fleet, under Admiral Nishimura, was to pass through the Philippines further south and emerge from the Surigao Strait, between Mindanao and Leyte. He was to attack the invasion fleet from the south.
Finally, Admiral Shima, with the smallest force (II Striking Force), was to sail from Japan via Formosa and join Admiral Nishimura. Shima hadn't originally been included in the plan but had persuaded his superiors to let his small force take part. The Japanese hoped that these three southern fleets could break into Leyte Gulf and inflict crushing losses on the landing craft, supply vessels and smaller warships supporting the invasion of Leyte.
Opposing Fleets
United States
Admiral Halsey's 3rd Fleet was the main American striking force in the Pacific. At Leyte Gulf it contained fifteen fleet carriers, seven modern fast battleships, twenty-one cruisers and fifty-eight destroyers. His ships were armed for combat with Japanese battleships and carriers. Halsey's main weakness was that he had contradictory orders - his main role was to find and destroy the Japanese fleet, but he was also there to protect the invasion fleets in Leyte Gulf.
Admiral Kinkaid's 7th Fleet was dedicated to supporting the ground troops. He had sixteen escort carriers, six 'old' battleships including several sunk at Pearl Harbor, eleven cruisers and eighty-six destroyers. This was a powerful force but did have one weakness. His carriers and battleships were armed for coastal bombardment, with high explosive shells and bombs, and carried very few armor piercing shells or bombs. When Kinkaid found himself facing Japanese battleships this caused great problems.
Japan
Admiral Ozawa's Northern or Main Force was coming from the Inland Sea in Japan, where his carrier air groups had been carefully reconstructed. He had four carriers, including the Zuikaku, one of the best Japanese carriers of the war and a veteran of Pearl Harbor. The other three were all light carriers produced by converting support ships that had been designed with that in mind - Zuiho, Chitose and Chiyoda. Many of the aircraft allocated to the carrier force were lost in the battle off Formosa (12-16 October 1944), and at Leyte Gulf he only had around 100 aircraft and very few experienced air crews.
Admiral Kurita commanded I Striking Force, which approached the battle from Brunei. At the heart of I Striking Force were the battleships Yamato and Musashi, the largest battleships in the world with nine fearsome 18.1in guns. Kurita also had Kongo and Haruna, two pre-First World War battlecruisers that had been turned into battleships in the late 1920, and the Nagato, a 16in battleship launched in 1919. This powerful force was supported by twelve cruisers and fifteen destroyers.
Admiral Nishimura, coming from Brunei, was given the two old battleships Fuso and Yamashiro, one cruiser and four destroyers. His only chance of success would come if Kurita or Ozawa had drawn almost the entire US fleet north away from the Surigao Strait.
Admiral Shima's II Striking Force (coming from Formosa) was the weakest of the Japanese fleets, and only contained three cruisers and four destroyers.
This gave the Japanese a total of four carriers, nine battleships, nineteen cruisers and thirty one destroyers. Despite the presence of the carriers, the most dangerous units were the battleships, which included the two largest and potentially most powerful in the world.
Brief Overview
The Japanese plan came quite close to success. The fighting began when two American submarines discovered Kurita's force on 23 October, sinking two cruisers (Battle of the Sibuyan Sea, 23-24 October 1944). This battle continued on 24 October when American aircraft sank the battleship Musahi. Admiral Halsey then detected Ozawa's carrier force and decided to head north to deal with this apparent threat. The bait had been taken.
The key day of the battle was 25 October when three separate battles were fought. In the north Halsey sank all four Japanese carriers (Battle of Cape Engano). In the south Kinkaid intercepted and destroyed Nishimura's fleet (Battle of Surigao Strait), and Shima decided to turn back.
The Japanese came closest to success in the center. With Halsey in the north and Kinkaid in the south the northern approaches to Leyte Gulf were only protected by escort carriers and destroyers. Kurita emerged from the San Bernardino Strait, turned south, and found Taffy Three, one of three task groups of six escort carriers. The American carriers turned and tried to reach relative safety. Their destroyer escorts made valiant attempts to interrupt the Japanese attack, while their aircraft made repeated attacks on the Japanese battleships. One escort carrier was sunk, but Kurita then decided to regroup and return to his original task in Leyte Gulf (Battle of Samar). Kurita spent the rest of the day chasing ghosts off Samar, before giving up and retiring through the San Bernardino Strait. With a bit more determination he could have inflicted a serious defeat on Taffy Three, and possibly done real damage to the invasion fleet in Leyte Gulf.
Detailed Account
Build-up to Battle
The pre-invasion attacks on Japanese bases between the Philippines and the East China Sea soon paid an unexpected dividend. On 10 October Mitscher attacked Okinawa. He then turned south and on 12 October attacked Formosa. This time the Japanese responded in some strength, having mis-interpreted the massive American air strikes as the start of an invasion. Admiral Toyoda issued the instructions to begin Sho-1 and Sho-2, and Japanese navy aircraft rose to attack the Americans. The resulting battle off Formosa (13-16 October 1944) was a massive American victory. Over 600 Japanese aircraft were destroyed. In return the Japanese managed to damage two cruisers. The Japanese claimed a massive victory and the destruction of eleven carriers and two battleships. The belief that they had crippled American naval air power played a part in the planning for the attack on Leyte Gulf. It also helped to convince the Japanese defenders of the Philippines that the first signs of the upcoming invasion weren't genuine, and instead were either false alarms or just American ships fleeing from the defeat.
The invasion began on 17 October when a small force of US Rangers landed on Suluan Island, at the mouth of Leyte Gulf. A Japanese lookout reported sighting two battleships, two carriers and six destroyers off the island (the attack force actually contained two light cruisers, four destroyers and eight destroyer transports). Admiral Toyoda decided this was indeed the start of the invasion and issued the orders that set the Japanese fleets in motion. His colleagues on the Philippines weren't convinced
On 18 October the Americans captured Homonhon and Dinagat Islands, at the entrance to Leyte Gulf, where they erected navigation lights. The defenders of the Philippines still didn't realize the attack was imminent, but back in Japan Toyoda issued the orders for Sho-1, after getting Imperial approval.
The naval bombardment of Leyte began on 19 October and did massive amounts of damage to the Japanese defenses on the Leyte beaches.
A-Day on Leyte was 20 October (MacArthur deliberately didn't use the more normal D-Day, which was now closely linked to the Normandy invasion in the public imagination). The landings went well - the Philippines were far too large for the Japanese to defend in the same way as was familiar from smaller islands, and the garrison of Leyte was both badly outnumbered and in some confusion. The Americans were ashore, and by the end of the first day 100,000 tons of supplies had been landed.
The first preliminary move came on 22 October when the Japanese fleets sailed from Brunei, heading for the Philippines. Kurita left first, as he had the longer journey, and Nishimura followed in the afternoon. Four separate Japanese fleets were now heading for the massive American armada in and around Leyte Gulf.
23 October
The battle of Leyte Gulf began well to the west of the Philippines on 23 October (battle of the Sibuyan Sea, 23-24 October, although this battle began outside that sea). Darter and Dace, two American submarines, found Kurita's fleet while it was sailing along the north coast of Palawan Island in the South China Sea. The American subs attacked Kurita and sank two cruisers, including his flagship Atago. A third cruiser was crippled and had to return to Brunei, taking two destroyers as a screen.
24 October
On the morning of 24 October, a Japanese scout plane based on Luzon found Task Force 38, sailing to the east of the island. The Japanese Navy had more aircraft based on Luzon than on Ozawa's carriers, and during the morning of 24 October just over 200 Japanese land based naval aircraft attacked the task force. For about an hour the Japanese were fought off, but just as the main attack ended the light carrier Princeton, part of TG 38.3, was hit by a single Japanese dive bomber. Prolonged efforts to save the carrier failed and eventually she was sunk by American torpedoes. Most of her crew survived, but an explosion caused heavy casualties on the cruiser Birmingham, one of the ships taking part in the fire-fighting effort.
Ozawa's carrier aircraft then made an appearance. At about 11.45 about two thirds of his aircraft attacked Halsey's fleet but without any success. The inexperienced carrier aviators then flew on to land on Luzon. At this point Halsey probably didn't realize that these aircraft came from a carrier force, but Ozawa was finally located by American scout planes in the afternoon.
Further south the IV Air Army (General Tominaga) attacked the 7th Fleet in Leyte Gulf, but again with little effect, although the escort carriers were forced to concentrate on air defense instead of close support. The Japanese lost around 70 aircraft in this attack.
Halsey's carriers also went onto the offensive on 24 October, launching five separate air strikes against Kurita, spread out from 9am until the mid-afternoon. The main victim of these attacks (battle of the Sibuyan Sea) was the giant battleship Musashi which sank after being hit by multiple torpedoes and bombs. A heavy cruiser was also badly damaged and forced to turn back. At around 15.30 Kurita decided to temporarily turn back to avoid coming under aerial attack in the narrow San Bernardino Strait. This move was seen by the Americans, who believed that Kurita might be retiring from the area. Instead after just under two hours he turned back east and headed into the San Bernardino Strait unobserved.
Halsey now had a choice to make. His orders from Nimitz were to protect the invasion fleet unless a chance came up to destroy the Japanese fleet. He now knew of three Japanese forces. To the north was Ozawa with four carriers and two battleships. To the west was Kurita, who had been battered all day, lost the biggest battleship in the world and begun a possible retreat. To the south was Nishimura with a force that wasn't really a threat to Kinkaid's 7th Fleet. Halsey decided that he could combine his two tasks by leading his 3rd Fleet north to destroy the Japanese carrier force. In every earlier battle of the Pacific War this would have been the correct decision - the carriers were now the most dangerous weapon in the naval armory and the highly skilled aviators of Pearl Harbor and the year that followed could have caused havoc if they reached the invasion fleets. Halsey's real mistake was that he failed to make sure that someone was watching Kurita and the San Bernardino Strait. He and Kinkaid both assumed that the other fleet was carrying out that task and, in the event, neither did.
Halsey has also been criticized for deciding to attack the Japanese carrier fleet in the first place, largely on the grounds that it was carrying very few aircraft, but there is no way that Halsey could have known this. The Japanese had only recently deployed large numbers of naval aircraft in the battles off Formosa, and Halsey had just been attacked twice by naval aircraft on 25 October. As far as he knew the four carriers and two modified battleships in the north were all carrying their full complement of aircraft. Halsey's mistake was not making sure a suitable force was watching the San Bernardino Strait.
25 October
Although there had been some hard fighting on the previous days the main part of the battle took part on 25 October when there were three separate engagements. In the north Halsey attacked Ozawa and sank all four of his carriers (Battle of Cape Engano). In the south Oldendorf's battleships crushed Nishimura's attack (Battle of the Surigao Strait). The crisis came in the center, where Kinkaid's escort carriers were unexpectedly attacked by Kurita's battle fleet (Battle of Samar). Here the Japanese came closest to success, sinking one carrier and threatening to wipe out an entire task group of six, before Kurita unexpectedly withdrew from the battle.
The Battle of Cape Engano
In the north the Americans won an easy victory. Halsey found Ozawa's carriers at dawn and send in five air strikes. He sank all four of the carriers and one destroyer and was about to complete the destruction of the Japanese fleet when urgent signals from Kinkaid and a stinging message from Nimitz finally forced him to turn south in an attempt to intercept Kurita.
The Battle of the Surigao Strait
In the south the fighting was equally one sided. Admiral Oldendorf, with the six old battleships of the 7th Fleet, blocked the exit from the Surigao Strait. Nishimura's ships were attacked by PT boats in the strait and by torpedoes from American destroyers as they approached the exit. One battleship and two destroyers were sunk and a third forced to turn back. By the time Nisihimura reached the American battleships he only had one battleship, one cruiser and one destroyer. In the resulting gun battle the battleship was sunk and the cruiser very badly damaged. It escaped for the moment but was sunk while attempting to escape. Only the destroyer reached safety. Shima realized the battle was lost and turned back, saving his ships. Their escape was aided by news from the north, where Kurita's battleships had emerged into Leyte Gulf. Oldendorf had to cancel the pursuit and turned north to prepare for a possible second battle.
The Battle of Samar
The most dangerous of the battles came in the center. Kurita emerged unnoticed from the San Bernardino Strait, turned south and headed towards Leyte Gulf. He then found Admiral Sprague's Taffy 3, of six escort carriers, three destroyers and four destroyer escorts. Sprague conducted a skillful fighting retreat, harassing the Japanese with his aircraft (despite their lack of armor piercing bombs) and destroyers. During the fighting the carrier Gambier Bay was sunk as were three of the escorts. Sprague's small group was close to defeat when Kurita decided to withdraw from the battle, reform his fleet and resume his advance into Leyte Gulf. The Japanese also suffered losses - three cruisers were sunk on the day and a fourth badly damaged.
Kurita turned away at 9.11am. It took two hours for his fleet to come back together. He then turned south and headed towards Leyte Gulf and the American shipping. At about 11.40 his scouts reported sighting a battleship (falsely) and Kurita turned aside to try and catch it. He then turned south again, before at 12.35 he decided to turn back north and try and find an American carrier group believed to be 100 miles to his north. In fact Halsey's carriers were much further north, and out of range. Kurita steamed north all afternoon in an attempt to find this phantom force, before at around 6pm he finally gave up and made his way back into the San Bernardino Strait heading west. The last surface naval battle of the Second World War was over.
26 October
The battle of Leyte Gulf rather faded away on 26 October. Halsey sent aircraft to attack the retreating Kurita, but they only succeeded in sinking one cruiser. The battered remnants of the Japanese Navy escaped, but not to fight another day.
Conclusion
The battle of Leyte Gulf was a massive Japanese defeat. The Japanese navy lost three battleships, four carriers, ten cruisers and nine destroyers, a total of 300,000 tons of shipping. The Americans only lost 37,000 tons of shipping, including one light carrier and two escort carriers. The Americans could easily replace these losses - they already had one hundred carriers of various types in the Pacific by October 1944! The Japanese Navy was crippled by its defeat at Leyte Gulf. The destruction of a large part of their surface fleet meant that the Americans were free to advance into the Philippines and then towards Japan without any fear of a major naval clash. The best the Japanese could manage was the final suicidal sortie of the giant battleship Yamato, sunk during an attempt to reach Okinawa.
Even if Kurita had been more determined on 25 October there was a limit to how much significant damage he could have done. As the Japanese commanders were aware, by 25 October most of the American transport ships were empty. He could have inflicted more damage on Taffy 3, but while that would have been embarrassing for the Americans it wouldn't have set them back. The loss of transport ships might have been more significant, but even that could only have delayed the final Japanese defeat. The Japanese Navy had found its decisive battle, unfortunately for Japan that battle had been lost.
Credit: Rickard, J (26 April 2012), Battle of Leyte Gulf, 23-26 October 1944
http://www.historyofwar.org/articles/battles_leyte_gulf.html
Map 1

Map 2
Log

Luzon Operation
Lingayen Gulf landings, 11 to 14 January 1945.
Close
Battle
Lingayen Gulf Landings, Philippines
Introduction
The Invasion of Lingayen Gulf (Filipino: Paglusob sa Golfo ng Lingayen), 6–9 January 1945, was an Allied amphibious operation in the Philippines during World War II. In the early morning of 6 January 1945, a large Allied force commanded by Admiral Jesse B. Oldendorf began approaching the shores of Lingayen. U.S. Navy and Royal Australian Navy warships began bombarding suspected Japanese positions along the coast of Lingayen from their position in Lingayen Gulf for three days. On 9 January, the U.S. 6th Army landed on a 20 mi (32 km) beachhead between the towns of Lingayen and San Fabian.
Background
During World War II, the Lingayen Gulf proved a strategically important theater of war between American and Japanese forces. On 22 December 1941, the Japanese 14th Army—under Lieutenant General Masaharu Homma—landed on the Eastern part of the gulf at Agoo, Caba, Santiago and Bauang, where they engaged in a number of relatively minor skirmishes[1] with the defenders, which consisted of a poorly equipped contingent of predominantly American and Filipino troops, and managed to successfully invade and occupy the gulf. Following the defeat, the next day General Douglas MacArthur issued the order to retreat from Luzon and withdraw to Bataan. For the next three years, the gulf remained under Japanese occupation prior to the Lingayen Gulf Landings.
Operations
Beginning on 6 January 1945, a heavy naval and air bombardment of suspected Japanese defenses on Lingayen began. Underwater demolitions began, but found no beach obstacles, and encountered sparse opposing forces. Aircraft and naval artillery bombardment of the landing areas also occurred, with kamikazes attacking on the 7th. On the 8th, it was observed that in the town of Lingayen, as a response to the pre-landing bombardment, Filipinos had begun to form a parade, complete with United States and Philippine flags; fire was shifted away from that area.
At 09:30 on 9 January 1945, about 68,000 GIs under General Walter Krueger of the U.S. 6th Army—following a devastating naval bombardment—landed at the coast of Lingayen Gulf meeting no opposition. A total of 203,608 soldiers were eventually landed over the next few days, establishing a 20 mi (32 km) beachhead, stretching from Sual, Lingayen and Dagupan (XIV Corps) to the west, and San Fabian (I Corps) to the east. The total number of troops under the command of MacArthur was reported to have even exceeded the number that Dwight D. Eisenhower controlled in Europe. Within a few days, the assault forces had quickly captured the coastal towns and secured the 20-mile-long (32 km) beachhead, as well as penetrating up to five miles (8 km) inland.
Despite their success in driving out the Japanese forces stationed there, they suffered relatively heavy losses; particularly to their convoys, due to kamikaze attacks. From 4–12 January, a total of 24 ships were sunk and another 67 were damaged by kamikazes; including the battleships USS Mississippi, New Mexico and Colorado (the latter was accidentally hit by friendly fire), the heavy cruiser HMAS Australia, the light cruiser USS Columbia, and the destroyers USS Long and USS Hovey. Following the landings, the Lingayen Gulf was turned into a vast supply depot for the rest of the war to support the Battle of Luzon.
Source: Wikipedia
https://en.wikipedia.org/wiki/Invasion_of_Lingayen_Gulf
Map 1

Map 2
Log

Manila Bay-Bicol Operations
Zambales-Subic Bay, 29 to 31 January 1945.
Close
Battle
Battle of Manila, Philippines
Introduction
The Battle of Manila (3 February – 3 March 1945) was a major battle of the Philippine campaign of 1944-45, during the Second World War. It was fought by American and Filipino forces against Japanese troops in Manila, the capital city of the Philippines. The month-long battle, which resulted in the death of over 100,000 civilians and the complete devastation of the city, was the scene of the worst urban fighting in the Pacific theater. Japanese forces committed mass murder against Filipino civilians during the battle. Along with massive loss of life, the battle also destroyed architectural and cultural heritage dating back to the city's foundation. The battle ended the almost three years of Japanese military occupation in the Philippines (1942–1945). The city's capture was marked as General Douglas MacArthur's key to victory in the campaign of reconquest. It is the last of the many battles fought within Manila's history
Background
On 9 January 1945, the Sixth U.S. Army under Lt. Gen. Walter Krueger waded ashore at Lingayen Gulf and began a rapid drive south in the Battle of Luzon. On 12 Jan., MacArthur ordered Krueger to advance rapidly to Manila. The 37th Infantry Division, under the command of Major Gen. Robert S. Beightler, headed south.
After landing at San Fabian on 27 Jan., the 1st Cavalry Division, under the command of Major Gen. Vernon D. Mudge, was ordered by MacArthur on 31 Jan., to "Get to Manila! Free the internees at Santo Tomas. Take Malacanang Palace and the Legislative Building."
On 31 January, the Eighth United States Army of Lt. Gen. Robert L. Eichelberger, consisting of the 187th and 188th Glider Infantry Regiments of Col. Robert H. Soule, and components of the U.S. 11th Airborne Division under Maj. Gen. Joseph Swing, landed unopposed at Nasugbu in southern Luzon and began moving north toward Manila. Meanwhile, the 11th A/B Division's 511th Regimental Combat Team, commanded by Col. Orin D. "Hard Rock" Haugen, parachuted onto Tagaytay Ridge on 4 February. On 10 Feb., the 11th Airborne Division came under the command of the Sixth Army, and seized Fort William McKinley on 17 Feb.
Swing was joined by the Hunters ROTC Filipino guerrillas, under the command of Lt. Col. Emmanuel V. de Ocampo, and by 5 Feb., they were on the outskirts of Manila.
Japanese defense
As the Americans converged on Manila from different directions, they found that most of the Imperial Japanese Army troops defending the city had been withdrawn to Baguio City, on the orders of General Tomoyuki Yamashita, commander in chief of Japanese Army forces in the Philippines. Yamashita planned to engage Filipino and U.S. forces in northern Luzon in a co-ordinated campaign, with the aim of buying time for the build-up of defenses against the pending Allied invasion of the Japanese home islands. He had three main groups under his command: 80,000 men of the Shimbu Group in the mountains east of Manila, 30,000 of the Kembu Group in the hills north of Manila, and 152,000 in the Shobu Group in northeastern Luzon.
In 1941, General Douglas MacArthur had declared Manila an open city before its capture. Although Yamashita had not done so in 1945, he had not intended to defend Manila; he did not think that he could feed the city's one million residents and defend a large area with vast tracts of flammable wooden buildings. Gen. Yamashita had originally ordered the commander of Shimbu Group, Gen. Shizuo Yokoyama, to destroy all bridges and other vital installations and then evacuate the city as soon as any large American forces made their appearance.
However, Rear Admiral Sanji Iwabuchi, commander of the Imperial Japanese Navy's 31st Naval Special Base Force, was determined to fight a last-ditch battle in Manila, and, though nominally part of the Shimbu Army Group, repeatedly ignored Army orders to withdraw from the city. The naval staff in Japan agreed to Iwabuchi's scheme, eroding a frustrated Yamashita's attempts at confronting the Americans with a concerted, unified defense. Iwabuchi had 12,500 men under his command, designated the Manila Naval Defense Force, augmented by 4,500 army personnel under Col. Katsuzo Noguchi and Capt. Saburo Abe. They built defensive positions in the city, including Intramuros, cut down the palm trees on Dewey Blvd. to form a runway, and set up barricades across major streets. Iwabuchi formed the Northern Force under Noguchi, and the Southern Force under Capt. Takusue Furuse.
Iwabuchi had been in command of the battleship Kirishima when she was sunk by a US Navy task force off Guadalcanal in 1942, a blot on his honor which may have inspired his determination to fight to the death. Before the battle began, he issued an address to his men:
“We are very glad and grateful for the opportunity of being able to serve our country in this epic battle. Now, with what strength remains, we will daringly engage the enemy. Banzai to the Emperor! We are determined to fight to the last man.”
Battle Santo Tomas internees liberated
On 3 February, elements of the U.S. 1st Cavalry Division under Maj. Gen. Verne D. Mudge pushed into the northern outskirts of Manila and seized a vital bridge across the Tullahan River, which separated them from the city proper, and quickly captured Malacanang Palace. A squadron of Brig. Gen. William C. Chase's 8th Cavalry, the first unit to arrive in the city, began a drive toward the sprawling campus of the University of Santo Tomas, which had been turned into the Santo Tomas Internment Camp for civilians and the US Army and Navy nurses sometimes known as the "Angels of Bataan."
Since 4 January 1942, a total of thirty-seven months, the university’s main building had been used to hold civilians. Out of 4,255 prisoners, 466 died in captivity, three were killed while attempting to escape on 15 February 1942, and one made a successful breakout in early January 1945.
Capt. Manuel Colayco, a USAFFE guerrilla officer, became an allied casualty of the city's liberation, after he and his companion, Lt. Diosdado Guytingco, guided the American First Cavalry to the front gate of Santo Tomas. Struck by Japanese bullets, Colayco died seven days later in Legarda Elementary School, which became a field hospital. At 9 PM, five tanks of the 44th Tank Battalion, headed by "Battlin' Basic," headed into the compound.
The Japanese, commanded by Lt. Col. Toshio Hayashi, gathered the remaining internees together in the Education Building as hostages, and exchanged pot shots with the Americans and Filipinos. The next day, 5 February, they negotiated with the Americans to allow them to rejoin Japanese troops to the south of the city, carrying only individual arms. The Japanese were unaware the area they requested, was the now American-occupied Malacañan Palace, and soon afterwards were fired upon and several were killed including Hayashi.
On 4 February, the 37th Infantry Division freed more than 1,000 prisoners of war, mostly former defenders of Bataan and Corregidor, held at Bilibid Prison, which had been abandoned by the Japanese.
Encirclement and massacres
Early on 6 February, General MacArthur announced that "Manila had fallen." In fact, the battle for Manila had barely begun. Almost at once the 1st Cavalry Division in the north and the 11th Airborne Division in the south reported stiffening Japanese resistance to further advances into the city.
General Oscar Griswold continued to push elements of the XIV Corps south from Santo Tomas University toward the Pasig River. Late on the afternoon on 4 February, he ordered the 2nd Squadron, 5th Cavalry Regiment, to seize Quezon Bridge, the only crossing over the Pasig that the Japanese had not destroyed. As the squadron approached the bridge, Japanese heavy machine guns opened fire from a formidable roadblock thrown up across Quezon Boulevard, forcing the cavalry to stop its advance and withdraw until nightfall. As the Americans and Filipinos pulled back, the Japanese blew up the bridge.
On 5 February, the 37th Infantry Division began to move into Manila, and Griswold divided the northern section of the city into two sectors, with the 37th responsible for advancing to the south, and the 1st Cavalry Division responsible for an envelopment to the east. The Americans secured the northern bank of the Pasig River by 6 February, and had captured the city's water supply at the Novaliches Dam, Balara Water Filters, and the San Juan Reservoir.
On 7 February, Gen. Beightler ordered the 148th Regiment to cross the Pasig River and clear Paco and Pandacan. The bitterest fighting for Manila - which proved costliest to the 129th Regiment - was in capturing the steam-driven power plant on Provisor Island, where the Japanese held out until 11 February. By the afternoon of 8 February, 37th Division units had cleared most of the Japanese from their sector, but the residential districts were damaged extensively. The Japanese added to the destruction by demolishing buildings and military installations as they withdrew. Japanese resistance in Tondo and Malabon continued until 9 February.
Trying to protect the city and its civilians, MacArthur had stringently restricted U.S. artillery and air support. Yet, by 9 February, American shelling had set fire to a number of districts. "If the city were to be secured without the destruction of the 37th and the 1st Cavalry Divisions, no further effort could be made to save buildings, everything holding up progress would be pounded." Iwabuchi's sailors, marines, and Army reinforcements, having initially had some success resisting American infantrymen armed with flamethrowers, grenades and bazookas, soon faced direct fire from tanks, tank destroyers, and howitzers, which blasted holes in one building after another, often killing both Japanese and civilians trapped inside, without differentiation.
Subjected to incessant pounding and facing certain death or capture, the beleaguered Japanese troops took out their anger and frustration on the civilians caught in the crossfire, committing multiple acts of severe brutality, which later would be known as the Manila Massacre. Violent mutilations, rapes, and massacres of the populace accompanied the battle for control of the city. Massacres occurred in schools, hospitals and convents, including San Juan de Dios Hospital, Santa Rosa College, Santo Domingo Church, Manila Cathedral, Paco Church, St. Paul's Convent, and St. Vincent de Paul Church.
By 12 February Iwabuchi's artillery and heavy mortars had been destroyed, and with no plan for withdrawal or regrouping, "each man had his meager supply of rations, barely sufficient arms and ammunition, and a building in which his life would end..." The 1st Cavalry Division reached Manila Bay on 12 February, but it was not until 18 February that they took Rizal Stadium, which the Japanese had turned into an ammunition dump, and Fort San Antonio Abad. On 17 February, the 148th Regiment took the Philippine General Hospital, freeing 7,000 civilians, the University of the Philippines Padre Faura campus, and Assumption College San Lorenzo's original Herran-Dakota campus.
Iwabuchi was ordered by Gen. Shizuo Yokoyama, commander of the Shimbu Group, to break out of Manila on the night of 17–18 February, in coordination with counter-attacks on Novaliches Dam and Grace Park. The breakout failed and Iwabuchi's remaining 6,000 men were trapped in Manila. The destruction of Manila, a quarter of a million civilian casualties, and the subsequent execution of General Yamashita for war crimes after the war was the result. Americans, 16,665 Japanese and 100,000 to 240,000 civilians were killed. There was no animosity amongst the liberated Filipinos, claiming, "We were with the Americans! We were safe! We were liberated!"
By 20 February, the New Police Station, St. Vincent de Paul Church, San Pablo Church, the Manila Club, City Hall and the General Post Office were in American hands. The Japanese retreated into Intramuros on the night of 19 February, and the Manila Hotel was liberated on 22 Feb., but MacArthur found his penthouse in ashes. Only Intramuros, plus the Legislative, Finance, and Agricultural Buildings, remained in Japanese hands.
Intramuros devastated
The assault on Intramuros started at 0730 on 23 February, with a 140 gun artillery barrage, followed by the 148th attacking through breaches made in the walls between the Quezon and Parian Gates, and the 129th crossing the Pasig River, then attacking near the location of the Government Mint.
The fighting for Intramuros continued until 26 February. Fewer than 3,000 civilians escaped the assault, mostly women and children who were released on the afternoon of 23 February. Colonel Noguchi's soldiers and sailors killed 1,000 men and women, while the other hostages died during the American shelling. Iwabuchi and his officers committed seppuku (ritual suicide) at dawn on 26 February. The 5th Cavalry Regiment took the Agricultural Building by 1 March, and the 148th Regiment took the Legislative Building on 28th Feb. and the Finance Building by 3 March.
Army Historian Robert R. Smith wrote:
"Griswold and Beightler were not willing to attempt the assault with infantry alone. Not expressly enjoined from employing artillery, they now planned a massive artillery preparation that would last from 17 to 23 February and would include indirect fire at ranges up to 8,000 yards as well as direct, point-blank fire from ranges as short as 250 yards. They would employ all available corps and division artillery, from 240mm howitzers down. (...) Just how civilian lives could be saved by this type of preparation, as opposed to aerial bombardment, is unknown. The net result would be the same: Intramuros would be practically razed." That the artillery had almost razed the ancient Walled City could not be helped. To the XIV Corps and the 37th Division at this state of the battle for Manila, American lives were understandably far more valuable than historic landmarks. The destruction stemmed from the American decision to save lives in a battle against Japanese troops who had decided to sacrifice their lives as dearly as possible."
Before the fighting ended, MacArthur summoned a provisional assembly of prominent Filipinos to Malacañan Palace and in their presence declared the Commonwealth of the Philippines to be permanently reestablished. "My country kept the faith," he told the gathered assembly. "Your capital city, cruelly punished though it be, has regained its rightful place—citadel of democracy in the East."
Aftermath
For the rest of the month the Americans and Filipino guerrillas mopped up resistance throughout the city. With Intramuros secured on 4 March, Manila was officially liberated, albeit completely destroyed with large areas levelled by American bombing. The battle left 1,010 U.S. soldiers dead and 5,565 wounded. An estimated 100,000 to 240,000 Filipinos civilians were killed, both deliberately by the Japanese in the Manila massacre and, from artillery and aerial bombardment by U.S. and Japanese forces. 16,665 Japanese dead were counted within Intramuros alone.
Destruction of the city
The battle for Manila was the first and fiercest urban fighting in the entire Pacific War. Few battles in the closing months of World War II exceeded the destruction and the brutality of the massacres and savagery of the fighting in Manila. In Manila's business district only two buildings were not damaged and those two were looted of their plumbing.
A steel flagpole stands at the entrance to the old U.S. Embassy building in Ermita, which was pockmarked by numerous bullet and shrapnel hits, and still stands today, a testament to the intense, bitter fighting for the walled city. In this category, Manila second to Stalingrad as being the city with the fiercest urban fighting during the war.
Filipinos lost an irreplaceable cultural and historical treasure in the resulting carnage and devastation of Manila, remembered today as a national tragedy. Countless government buildings, universities and colleges, convents, monasteries and churches, and their accompanying treasures dating to the founding of the city, were ruined. The cultural patrimony (including art, literature, and especially architecture) of the Orient's first truly international melting pot - the confluence of Spanish, American and Asian cultures - was eviscerated. Manila, once touted as the "Pearl of the Orient" and famed as a living monument to the meeting of Asian and European cultures, was virtually wiped out.
Most of the buildings damaged during the war were demolished after the Liberation, as part of rebuilding Manila, replacing European style architecture from the Spanish and early American era with modern American style architecture. Only a few old buildings remain intact.
Source: wikipedia.com
https://en.wikipedia.org/wiki/Battle_of_Manila_(1945)
Map 1
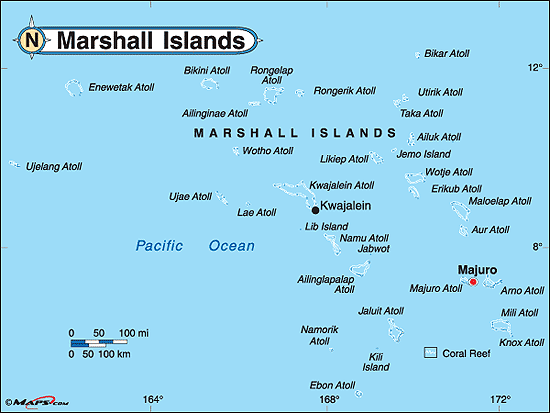
Map 2
Log

Okinawa Operation
Assault and occupation of Okinawa, 1 to 5 April 1945.
Close
Battle
Battle of Okinawa
Significance
Okinawa was the largest amphibious invasion of the Pacific campaign and the last major campaign of the Pacific War. More ships were used, more troops put ashore, more supplies transported, more bombs dropped, more naval guns fired against shore targets than any other operation in the Pacific. More people died during the Battle of Okinawa than all those killed during the atomic bombings of Hiroshima and Nagasaki. Casualties totaled more than 38,000 Americans wounded and 12,000 killed or missing, more than 107,000 Japanese and Okinawan conscripts killed, and perhaps 100,000 Okinawan civilians who perished in the battle.
The battle of Okinawa proved to be the bloodiest battle of the Pacific War. Thirty-four allied ships and craft of all types had been sunk, mostly by kamikazes, and 368 ships and craft damaged. The fleet had lost 763 aircraft. Total American casualties in the operation numbered over 12,000 killed [including nearly 5,000 Navy dead and almost 8,000 Marine and Army dead] and 36,000 wounded. Navy casualties were tremendous, with a ratio of one killed for one wounded as compared to a one to five ratio for the Marine Corps. Combat stress also caused large numbers of psychiatric casualties, a terrible hemorrhage of front-line strength. There were more than 26,000 non-battle casualties. In the battle of Okinawa, the rate of combat losses due to battle stress, expressed as a percentage of those caused by combat wounds, was 48% [in the Korean War the overall rate was about 20-25%, and in the Yom Kippur War it was about 30%]. American losses at Okinawa were so heavy as to illicit Congressional calls for an investigation into the conduct of the military commanders. Not surprisingly, the cost of this battle, in terms of lives, time, and material, weighed heavily in the decision to use the atomic bomb against Japan just six weeks later.
Japanese human losses were enormous: 107,539 soldiers killed and 23,764 sealed in caves or buried by the Japanese themselves; 10,755 captured or surrendered. The Japanese lost 7,830 aircraft and 16 combat ships. Since many Okinawan residents fled to caves where they subsequently were entombed the precise number of civilian casualties will probably never be known, but the lowest estimate is 42,000 killed. Somewhere between one-tenth and one-fourth of the civilian population perished, though by some estimates the battle of Okinawa killed almost a third of the civilian population. According to US Army records during the planning phase of the operation, the assumption was that Okinawa was home to about 300,000 civilians. At the conclusion of hostilities around 196,000 civilians remained. However, US Army figures for the 82-day campaign showed a total figure of 142,058 civilian casualties, including those killed by artillery fire, air attacks and those who were pressed into service by the Japanese army.
By April 1945 German resistance in the European Campaign was on the verge of collapse, but the Empire of Japan continued to defiantly resist American advances across the Pacific. Strategically located some 400 miles south of Japan, possession of Okinawa would enable the Allies to cut Japan's sea lines of communication and isolate it from its vital sources of raw materials in the south. If the invasion of Japan proved necessary, Okinawa's harbors, anchorages, and airfields could be used to stage the ships, troops, aircraft, and supplies necessary for the amphibious assault. The island had several Japanese air bases and the only two substantial harbors between Formosa and Kyushu.
The outbreak of hostilities in China during the 1930s initially had little impact on the inhabitants of the Ryukyu Islands, a chain running southwest from the Japanese home island of Kyushu toward Taiwan. Despite its size, of approximately 480 square miles and its population of perhaps 500,000, Okinawa had neither surplus food nor a great deal of industry to assist the Japanese effort. Its harbor facilities were unsuitable for large warships. The island's main contribution to the war effort lay in the production of sugarcane, which could be converted into commercial alcohol for torpedoes and engines.
From the first days of the Asia-Pacific war, Okinawa was fortified as the location of airbases and as the frontline in the defense of mainland Japan. Land and farms were forcibly expropriated throughout Okinawa and the Imperial Japanese Army began the construction of airbases.
Operation Iceberg
By late October 1944, Okinawa, in the Ryukyu Island chain, had been targeted for invasion by Allied forces. This invasion -- code named Operation Iceberg --- would see the assembling of the greatest naval armada ever. Admiral Raymond A. Spruance's 5th fleet was to include more than 40 aircraft carriers, 18 battleships, 200 destroyers and hundreds of assorted support ships. Some 1,300 US ships surrounded the island. Of those, 365 were amphibious ships. Over 182,000 troops would make up the assault, planned for 01 April 1945, Easter Sunday. On 29 September 1944 B-29 bombers conducted the initial reconnaissance mission over Okinawa and its outlying islands. On 10 October 1944 nearly two hundred of Admiral Halsey's planes struck Naha, Okinawa's capital and principal city, in five separate waves. The city was almost totally devastated. The American war against Japan was coming inexorably closer to the Japanese homeland.
In mid-March 1945, the American fleet of over 1,300 ships gathered off Okinawa for the naval bombardment The first kamikaze attacks of the Okinawan campaign began on 18 March 1945. On 21 March, the first baka or piloted, suicide rocket bombs, were spotted below Japanese "Betty" bombers.
The invasion began on 01 April 1945 when 60,000 troops (two Marine and two Army divisions) landed with little opposition. The day began and ended with the heaviest concentration of naval gunfire ever expended to support an amphibious landing. Gathered off the invasion beaches were 10 older American battleships, including several Pearl Harbor survivors-the USS Tennessee, Maryland, and West Virginia-as well as 9 cruisers, 23 destroyers and destroyer escorts, and 117 rocket gunboats. Together they fired 3,800 tons of shells at Okinawa during the first 24 hours. Okinawans had long been resigned to the severe typhoons that sweep their land, but nothing in their experience prepared them for the tetsu no bow -- the "storm of steel" -- as one Okinawan characterized the assault on the island. At 0830 the 7th and 96th Infantry Divisions of the XXIV Corps and the 1st and 6th Marine Divisions of the III Amphibious Corps crossed the Hagushi beaches, with 16,000 troops landing unopposed in the first hour. By nightfall more than 60,000 were ashore.
Although Okinawa was strongly defended by more than 100,000 troops, the Japanese chose not to defend the beaches. The uncontested landings of 01 April were part of the overall Japanese strategy to avoid casualties defending the beach against overwhelming Allied firepower. A system of defense in depth, especially in the southern portion of the island, would permit the 100,000-man-strong Japanese 32nd Army under General Ushijima to fight a protracted battle that would put both the attacking amphibious forces and naval armada at risk. The Japanese dug into caves and tunnels on the high ground away from the beaches in an attempt to negate the Allies' superior sea and air power.
The battle proceeded in four phases: first, the advance to the eastern coast (April 1-4); second, the clearing of the northern part of the island (April 5-18); third, the occupation of the outlying islands (April 10 - June 26); and fourth, the main battle against the dug in elements of the 32nd Army which began on 06 April and did not end until 21 June. Although the first three phases encountered only mild opposition, the final phase proved extremely difficult because the Japanese were well-entrenched in and naval gunfire support was ineffective.
On April 6-7, the first use of massed formations of hundreds of kamikaze aircraft called kikusui, or "floating chrysanthemum", for the imperial symbol of Japan, began. By the end of the Okinawan campaign, 1,465 kamikaze flights were flown from Kyushu to sink 30 American ships and damage 164 others. The Japanese had devised a plan to load-up high-speed motorboats with high explosives and have them attack the American Fleet. The boats were hidden in caves up rivers and pulled inside along railroad tracks. The plan never was carried out, however.
Naval Battle
The Japanese battleship, Yamato, the largest warship ever built accompanied by the light cruiser Yahagi and eight destroyers, was dispatched to Okinawa on 06 April 1945, with no protective air cover. So badly depleted was the Japanese fleet by this time, Yamato was reported to carry only enough fuel for a one-way trip to Okinawa. Her mission: beach herself at Okinawa and fight until eliminated. The American submarine Hackleback tracked her movements and alerted carrier-based bombers. Vice Admiral Marc Mitscher launched air strikes on April 7 at 10 a.m. The first hits on Yamato were claimed by the carrier Bennington. San Jacinto planes sunk the destroyer Hamakaze, with a bomb and torpedo hit. The light cruiser Yahagi was hit by bombs and went dead in the water. For the next two hours, the Japanese force was under constant attack. Yamato took 12 bombs and seven torpedo hits within two hours, finally blowing up and sinking. Three accompanying destroyers were so badly damaged they had to be scuttled. Four remaining destroyers could not return to Japan. Of Yamato's crew of 2,747, all but 23 officers and 246 enlisted men were lost. Yahagi lost 446; Asashimo lost 330; the seven destroyers, 391 officers and men. There were few Japanese survivors. Losses to the Americans were 10 planes and 12 men. This was the last Japanese naval action of the war.
Japanese Defense
By 19 April soldiers and marines of the US Tenth Army under Lt. General Buckner were engaged in a fierce battle along a fortified front which represented the outer ring of the Shuri Line. This fighting contrasted dramatically with the unopposed landings and initial rapid advances of the previous weeks. The Shuri defenses were deeply dug into the limestone cliffs and boasted mutually supporting positions as well as a wealth of artillery of various calibers. As the battle dragged on, American casualties mounted. This delay in securing the island caused great consternation among the naval commanders since the fleet of almost 1,600 ships was exposed to heavy enemy air attacks. The most damage from the Japanese attacks came from operation Ten-Go (Heavenly Operation) which employed mass deployment of the fearsome kamikaze.
American losses mounted as soldiers and marines assaulted points on the Shuri line with the deceptive names of Sugar Loaf, Chocolate Drop, Conical Hill, Strawberry Hill, and Sugar Hill. During the course of the battle American forces were informed of two pieces of dramatic news, one tragic and the other joyous. The first was the death of president Franklin Roosevelt on 12 April and the latter the surrender of Nazi Germany on 8 May.
By the end of May, monsoon rains which turned contested slopes and roads into a morass exacerbated both the tactical and medical situations. The ground advance began to resemble a World War I battlefield as troops became mired in mud and flooded roads greatly inhibited evacuation of wounded to the rear. Troops lived on a field sodden by rain, part garbage dump and part graveyard. Unburied Japanese bodies decayed, sank in the mud, and became part of a noxious stew. Anyone sliding down the greasy slopes could easily find their pockets full of maggots at the end of the journey.
Heavy pressure on the Shuri Line finally convinced General Ushijima to withdraw southward to his final defensive positions on the Kiyamu Peninsula. His troops began moving out on the night of 23 May but were careful to leave behind rear-guard elements that continued to slow the American advance. Japanese soldiers, too wounded to travel, were given lethal injections of morphine or simply left behind to die. By the first week of June, US forces had captured only 465 enemy troops while claiming 62,548 killed. It would take 2 more weeks of hard fighting and an additional 2 weeks of "mopping up " operations pitting explosives and flamethrowers against determined pockets of resistance before the battle would finally be over. The so called "mopping up" fighting between 23 and 29 June netted an additional 9,000 enemy dead and 3,800 captured. Among the Japanese, the incidence of suicide soared during the final days. An examination of enemy dead revealed that, rather than surrender, many had held grenades against their stomachs, ending their personal war in that manner. General Ushijima committed ritual suicide (hara-kiri) on 16 June, convinced that he done his duty in service to the Emperor.
The document ending the Battle of Okinawa was signed on what is now Kadena Air Base on 07 September 1945. Long before the firing stopped on Okinawa, engineers and construction battalions, following close on the heels of the combat forces, were transforming the island into a major base for the projected invasion of the Japanese home islands.
Source: globalsecurity.org
https://www.globalsecurity.org/military/facility/okinawa-battle.htm
Map 1

Map 2
Log
